
Applying universal design principles in tiny bathrooms means creating an open, accessible layout with wide entryways, zero-threshold entrances, and clear pathways for easy movement. Choose space-saving fixtures like wall-hung toilets and compact vanities, and incorporate smart tech for added safety. Prioritize adjustable lighting, slip-resistant materials, and grab bars to enhance safety and comfort. By implementing these strategies, you’ll maximize your space’s potential and support everyone’s needs—continue exploring how to turn small baths into inclusive retreats.
Key Takeaways
- Implement open layouts with wide doorways and clear pathways to maximize circulation and accessibility in small bathrooms.
- Use space-saving fixtures like wall-hung toilets and compact vanities to enhance functionality without sacrificing comfort.
- Incorporate smart technology and adjustable lighting to improve safety, independence, and environmental comfort for diverse users.
- Position fixtures within reach ranges (15-48 inches) and include grab bars to support users with varying mobility needs.
- Design for privacy and inclusive use by strategic fixture placement, soundproofing, and tactile signage, ensuring comfort for all users.
Embracing Open Layouts for Better Movement
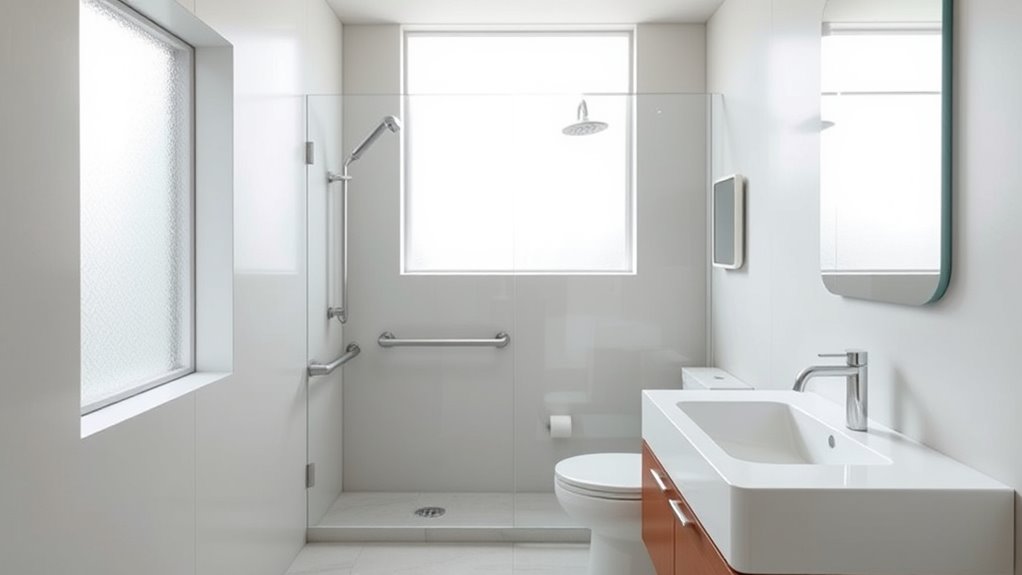
Embracing open layouts in tiny bathrooms markedly improves movement and accessibility. By removing unnecessary walls and barriers, you create a space that’s easier to navigate, especially for those using mobility aids like wheelchairs or walkers. Wide entryways and hallways, at least 36 inches, make it simple to move freely and accommodate assistive devices. Zero-threshold entrances and curbless showers eliminate obstacles, allowing smooth transitions from one area to another. Using transparent or translucent materials helps maintain an open feel while preserving privacy. An open floor plan offers flexible space that can adapt to different needs, whether for daily use or future accessibility upgrades. Design advancements address both function and visual appeal. Additionally, selecting appropriate lighting control enhances safety and visibility within the space. This approach guarantees a safer, more comfortable environment for everyone who uses your tiny bathroom.
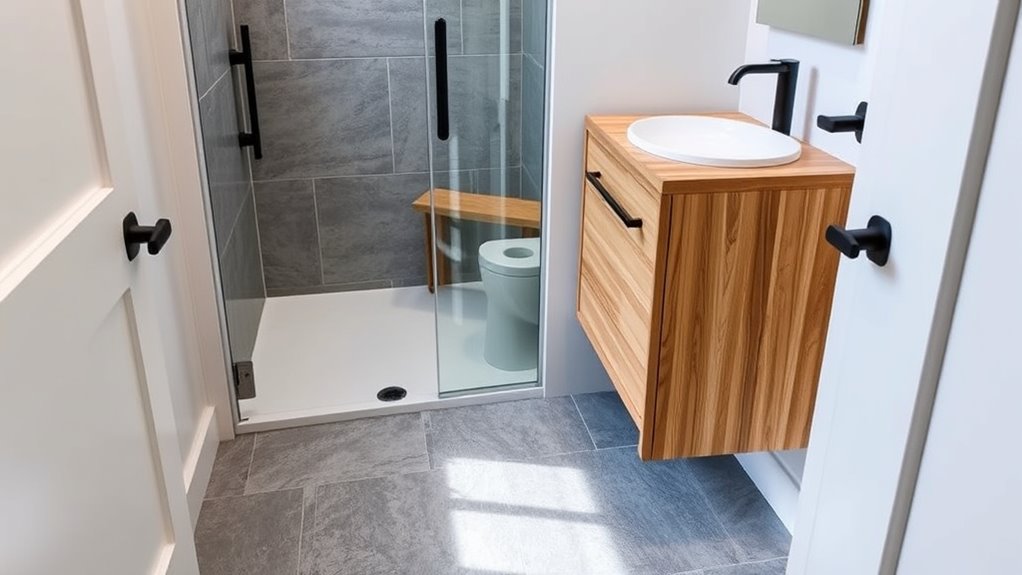
Choosing Space-Saving Fixtures and Fittings
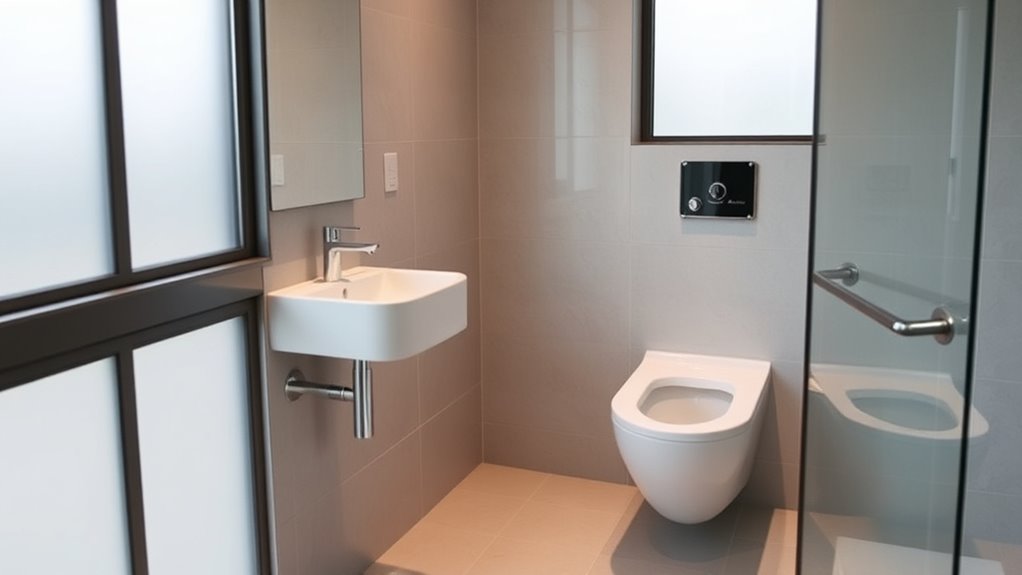
Selecting the right fixtures is essential for maximizing space and maintaining accessibility in tiny bathrooms. Compact vanities like pedestal sinks or wall-mounted units free up floor space and improve movement. Wall-hung toilets create a more open feel, making the room appear larger. Curbless showers eliminate barriers, easing access for mobility aids. Foldable shower seats can be tucked away when not in use, preserving openness. Compact hand dryers reduce visual clutter and wall usage. Additionally, choosing fixtures made from natural materials can enhance the rustic charm often associated with farmhouse bedrooms.
Ensuring Clear and Reachable Accessibility Features
You need to position fixtures within easy reach, ideally between 15 and 48 inches, so everyone can use them comfortably. Keep pathways clear and wide enough for wheelchairs or mobility aids to move smoothly. Make sure signage and labels are visible and easy to read to help users navigate confidently. Incorporating universal design principles ensures that the bathroom is accessible and functional for all users. Additionally, selecting fixtures with adjustable features can accommodate a range of users and preferences.
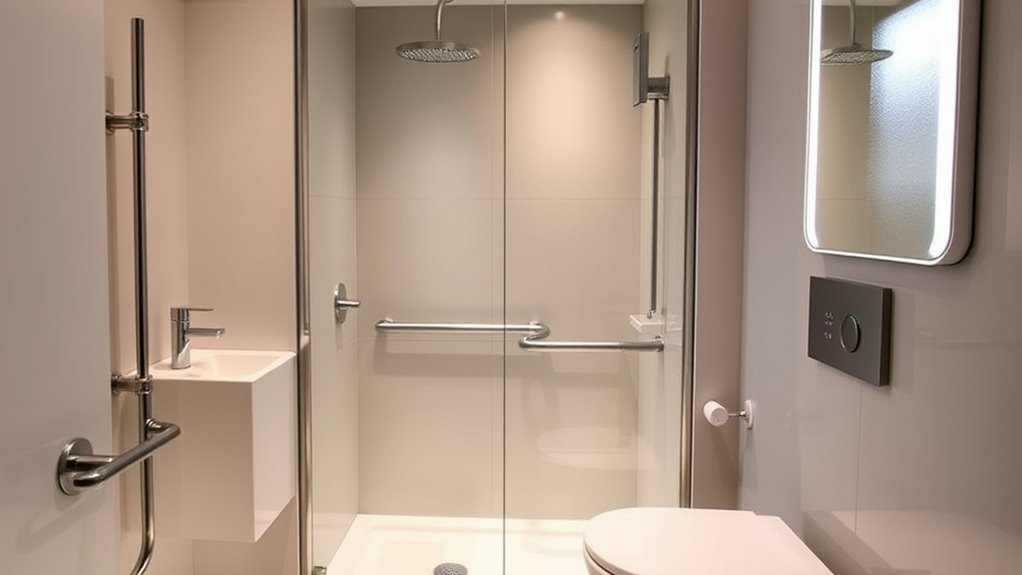
Reachable Fixture Placement
Placing fixtures thoughtfully is essential to guaranteeing that all users can comfortably access and operate them. Proper placement guarantees reachability and ease of use. First, position controls like shower valves and faucets between 38 and 48 inches from the floor, so seated and standing users can reach them without strain. Second, install grab bars at 33 to 36 inches high to assist transfers and balance. Third, place soap dishes, shelves, and towel bars between 38 and 48 inches above the floor to keep essentials within easy reach. Ensure that toilet paper holders are 7 to 9 inches in front of the toilet and 15 to 48 inches above the floor for effortless use. Thoughtful fixture placement maximizes accessibility, especially in tiny bathrooms where space is limited. Proper fixture placement also helps accommodate users with different abilities, making the bathroom more inclusive and safe for everyone.
Clear Pathways and Openings
Ensuring clear pathways and openings is essential for creating a universally accessible tiny bathroom. You should maintain a minimum of 32 inches of width in pathways to allow wheelchair access comfortably. A clear floor space of at least 5 feet in diameter enables easy turning and maneuvering. Avoid narrow spots and sharp turns that hinder movement, and make sure doorways don’t swing into turning circles, maximizing usable space. Keep the floor barrier-free, with no level changes or thresholds that could cause trips or hinder rolling access. Installing a curbless shower and level, non-slip flooring supports safe and effortless movement. Proper fixture placement and open zones around key features help users navigate without obstruction, promoting safety and independence in your tiny bathroom. Maintaining adequate headroom is also important to prevent discomfort and ensure full accessibility during movement, and considering appropriate lighting can greatly enhance visibility and safety.
Visible Signage and Labels
Clear pathways and open spaces in a tiny bathroom make navigation easier, but visible signage and labels further support accessibility by guiding users to key features. Proper signage must be mounted between 48 and 60 inches from the floor for visibility. You should include tactile characters and Braille to assist visually impaired users, ensuring they can identify signs independently. Use high contrast colors, like black and white, to improve readability, and opt for sans-serif fonts at least 3/4 inch high for visual signs and 5/8 inch for tactile ones. Incorporate clear pictograms and international symbols of accessibility. To enhance understanding, follow these guidelines: Signage should also be designed to be durable and resistant to wear and tear, such as using weather-resistant materials or protective coatings. Place signs consistently near entrances and key features. Use durable hardware for secure mounting. Integrating signage into overall accessibility strategies ensures a cohesive approach to user navigation and safety. Provide clear directional information for easy navigation.
Optimizing Lighting for Safety and Visibility
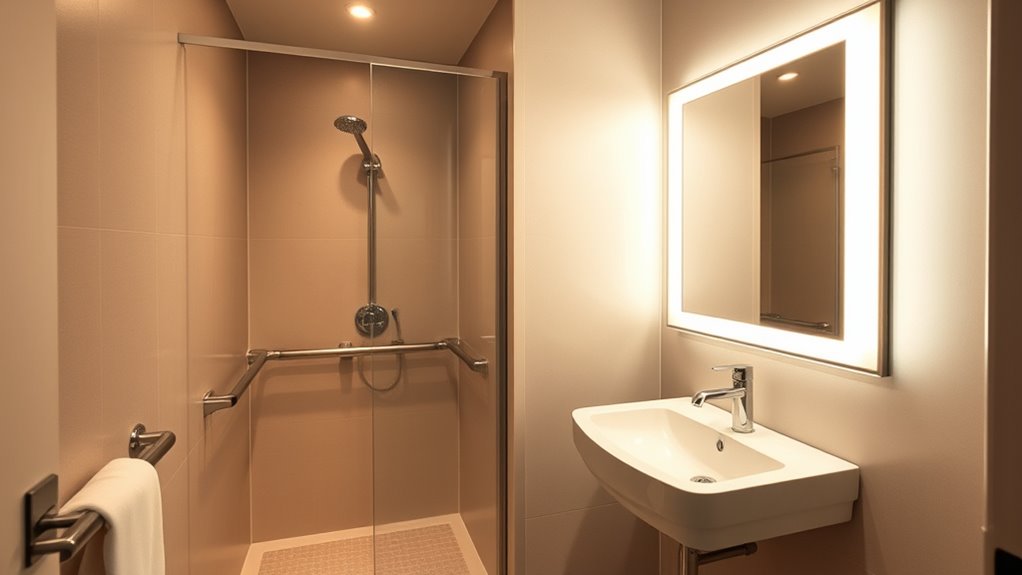
To guarantee safety and clear visibility, you need to focus on creating uniform brightness and layering different light sources. Proper placement of fixtures can minimize shadows and glare, making hazards more visible and reducing slip risks. Layering lighting by combining ambient, task, and accent lights ensures that all areas are adequately illuminated without overpowering the space. Additionally, understanding lighting principles can help you choose the best fixtures and placement strategies for tiny bathrooms, improving both function and comfort in tiny bathrooms.
Brightness Uniformity Tips
Achieving uniform brightness in tiny bathrooms is essential for safety and ease of use. Proper lighting prevents harsh shadows, reduces eye strain, and enhances visibility for users with visual impairments. To optimize lighting, consider these tips:
- Use multiple fixtures on different walls or ceilings to distribute light evenly and eliminate shadows.
- Incorporate diffused or frosted covers to soften light and avoid glare spots.
- Install adjustable lighting options to tailor brightness levels throughout the day, accommodating individual needs.
- Incorporating proper placement and selection of fixture types can also improve overall safety by minimizing dark areas and ensuring consistent illumination. Additionally, understanding the importance of digital literacy helps parents choose appropriate lighting solutions that support both safety and energy efficiency.
Layered Lighting Strategies
Layered lighting strategies enhance safety and visibility by combining different light sources at various heights and locations within a tiny bathroom. Ceiling fixtures, like recessed lights or pendants, create an ambient base for general illumination. Mid-level options such as wall sconces or vanity lights reduce shadows on your face, making grooming safer and easier. Low-level lights, like toe-kick or motion sensors, improve navigation at night, increasing accessibility for users with limited vision. Uplights or plug-in lights highlight features like grab bars or edges, preventing accidents. Task lighting around sinks and showers, such as side-mounted sconces or LED strips, boost clarity for detailed tasks. Properly layered lighting ensures safety, enhances visibility, and adapts to your needs, making your tiny bath both functional and user-friendly. Incorporating effective preparation in your lighting plan can help maximize safety and aesthetic appeal.
Glare and Shadow Control
Glare can cause discomfort and make it difficult to see, increasing fall risks. Shadows can hide hazards like wet floors or obstacles, especially in small spaces or for users with low vision. Proper lighting placement minimizes shadows around sinks and showers. To improve safety:
- Use diffused fixtures like frosted or shaded lights to soften glare.
- Position lights to avoid direct glare into eyes or reflections off mirrors and tiles.
- Incorporate recessed lighting or LED tape for even illumination without hotspots.
- Ensuring the correct color temperature of lighting can reduce eye strain and improve overall visibility lighting quality, which influences visual comfort and safety. Additionally, selecting energy-efficient fixtures can reduce heat emission, keeping the space cooler and more comfortable during extended use.
Controlling shadows involves placing multiple light sources around high-traffic areas and using wall-mounted sconces at eye level. These strategies enhance visibility and safety for all users.
Selecting Durable and Slip-Resistant Materials
Choosing the right materials is essential for ensuring safety and durability in tiny bathrooms. For slip resistance, opt for matte or textured finishes on ceramic tiles with a COF above 0.6, and check slip ratings from reputable brands. Porcelain tiles are stronger and more durable, often featuring slip-resistant coatings like ‘slip shield,’ and can mimic natural stone or wood for style. Luxury vinyl and vinyl plank flooring offer waterproof cores and textured surfaces, making them comfortable and easy to maintain. Natural stone with non-slip finishes provides a luxurious look but requires regular maintenance. Glazed ceramic tiles are budget-friendly, safe, easy to clean, and suitable for less-trafficked areas. Use tiles with a COF (coefficient of friction) > 0.6 for safety in wet areas. Prioritizing these materials helps create a safer, longer-lasting tiny bath.
Incorporating Smart Technology for Ease of Use
Integrating smart technology into tiny bathrooms considerably enhances ease of use and accessibility. Voice-controlled systems let you manage lighting, water temperature, and ventilation with simple commands, making daily routines easier, especially for those with mobility challenges. AI platforms personalize settings like brightness and water flow, adapting automatically to your preferences. Connecting with smart home assistants enables hands-free operation, reducing surface contact and promoting hygiene. Benefits of accessible bathroom technology include promoting independence and preventing accidents. Consider these features: 1. Voice-activated controls for lighting, water, and ventilation. 2. Motion sensors for taps, toilets, and lighting to eliminate manual operation. 3. Automated fixtures with adjustable height and digital temperature presets for customized comfort. Additionally, integrating smart microcontroller systems can further automate and optimize bathroom functions for a seamless experience. These innovations support independence, streamline bathroom tasks, and create a safer, more user-friendly environment.
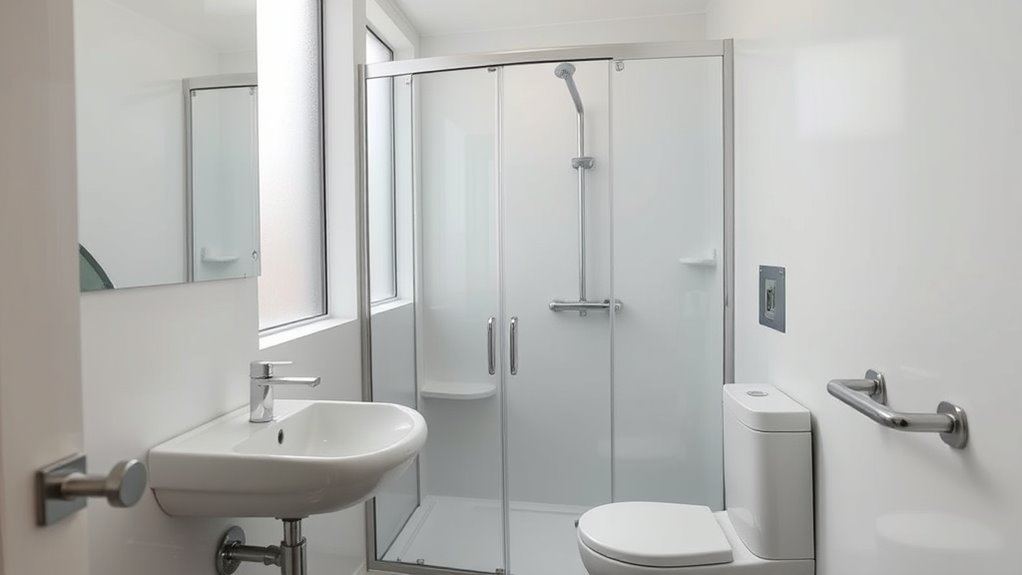
Designing for Wheelchair Accessibility and Maneuverability

Designing a tiny bathroom for wheelchair accessibility requires careful planning of space and layout. You need at least 60 inches of clear floor space for turning, ensuring a comfortable 60-inch radius for maneuvering. Keep fixtures like sinks and dispensers outside this space to prevent obstructions. The door should be at least 32 inches wide, with easy-to-use lever handles and a maximum opening force of 5 pounds. Ensure there’s enough clearance on both sides for easy entry and exit. The toilet area must be at least 60 inches wide and 56 inches deep, with the centerline 16–18 inches from the side wall for transfers. Install grab bars on side and rear walls. The sink should be no higher than 34 inches, with at least 29 inches of knee clearance and lever or sensor controls within reach. Maintain unobstructed space for smooth wheelchair navigation.
Prioritizing Safety With Rounded Edges and Grab Bars

Prioritizing safety in tiny bathrooms means paying close attention to features that reduce injury risks, such as installing grab bars and using fixtures with rounded edges. Rounded edges on fixtures and furniture lower the chances of cuts and bruises from accidental impacts. Grab bars provide essential support, helping prevent falls during transfers and while standing. To maximize safety, consider these key points: 1. Install grab bars securely into wall studs at heights of 33-36 inches and near seating areas. 2. Choose fixtures with rounded edges to minimize sharp corner hazards. 3. Use slip-resistant surfaces on floors and in showers to prevent slips and falls. Research indicates that properly placed grab bars and rounded fixtures significantly contribute to fall prevention and safety in small bathroom environments.
Enhancing Privacy and Comfort in Compact Spaces
Maximizing privacy and comfort in small bathrooms requires thoughtful layout choices and smart use of space. Use larger doorways (36+ inches) with effective door designs to allow wheelchair access without sacrificing privacy. Incorporate partial-height partitions or frosted glass to provide visual privacy while keeping sightlines open for safety. Sliding or pocket doors save space and are easier for users with limited mobility. Clever placement of mirrors and lighting makes the room feel larger and less confining. Privacy screens or recessed toilet alcoves with doors maintain seclusion in multi-user setups. Open floor plans improve maneuverability, and wall-mounted fixtures reduce clutter. Frosted glass, sound-absorbing materials, and layered lighting enhance both visual and acoustic privacy, creating a comfortable, accessible environment for all users. Universal Design Principles emphasize the importance of adaptable, inclusive spatial arrangements that cater to a diverse range of needs.
Frequently Asked Questions
How Does Universal Design Improve Bathroom Safety for Seniors?
You can improve bathroom safety for seniors by incorporating universal design features. Walk-in showers with low thresholds prevent falls, non-slip flooring adds stability, and grab bars provide essential support. Wider doorways and clear spaces make movement easier, reducing tripping hazards. Proper lighting and contrasting colors help identify wet or uneven areas. These adjustments promote independence, minimize injuries, and make the bathroom safer and more accessible for seniors.
Are There Specific Regulations for Tiny Bathroom Accessibility?
Yes, there are specific regulations for tiny bathroom accessibility, mainly from the ADA. You need a 60-inch turning diameter for wheelchair maneuverability, at least 16 to 18 inches of toilet side clearance, and grab bars on the back and side walls. Doors should have a minimum 32-inch opening, and sinks must be reachable at 34 inches high with knee clearance. These rules help maximize safety and usability in small spaces.
Can Smart Technology Be Integrated Into Existing Small Bathrooms?
Imagine turning your small bathroom into a smart sanctuary—yes, it’s possible. You can easily integrate smart fixtures like touchless toilets, digital faucets, and smart mirrors without major remodeling. Wireless tech and retrofit kits make upgrades simple, and voice commands make everyday tasks effortless. These enhancements boost accessibility, hygiene, and convenience, transforming your tiny space into a high-tech haven—proof that size doesn’t limit innovation.
What Materials Are Best for Moisture Resistance and Safety?
You should choose materials that resist moisture and enhance safety, like acrylic surfaces, waterproof membranes, and textured, slip-resistant flooring. Acrylic is durable, easy to mold, and supports safety features like grab bars. Waterproof membranes prevent water damage, while non-slip tiles or coatings reduce fall risks. Incorporate moisture-resistant fixtures, such as grab bars and adjustable showerheads, to guarantee your small bathroom is both safe and moisture-proof, meeting your needs effectively.
How Can I Customize Fixtures for Different User Needs?
Think of your bathroom fixtures as a tailored suit—customized perfectly for every user’s needs. You can install adjustable-height showerheads and seats, making them versatile for seated or standing users. Use lever or touchless faucets to ease operation, especially for those with limited strength. Incorporate different heights for sinks and grab bars, ensuring everyone feels supported and comfortable. This personalized approach transforms your tiny bath into an inclusive, user-friendly space.
Conclusion
By embracing open layouts, choosing space-saving fixtures, ensuring clear accessibility, optimizing lighting, selecting slip-resistant materials, incorporating smart technology, designing for wheelchair maneuverability, prioritizing safety with grab bars, and enhancing privacy, you create a tiny bath that’s functional, safe, and comfortable. When you focus on these universal design principles, you make your space welcoming, easy to use, and adaptable, turning even the smallest bathroom into a place of convenience, comfort, and confidence.

I’m Theodore, and I love tiny houses. In fact, I’m the author of Tiny House 43, a book about tiny houses that are also tree houses. I think they’re magical places where imaginations can run wild and adventures are just waiting to happen.
While tree houses are often associated with childhood, they can be the perfect adult retreat. They offer a cozy space to relax and unwind, surrounded by nature. And since they’re typically built on stilts or raised platforms, they offer stunning views that traditional homes simply can’t match.
If you’re looking for a unique and romantic getaway, a tree house tiny house might just be the perfect option.