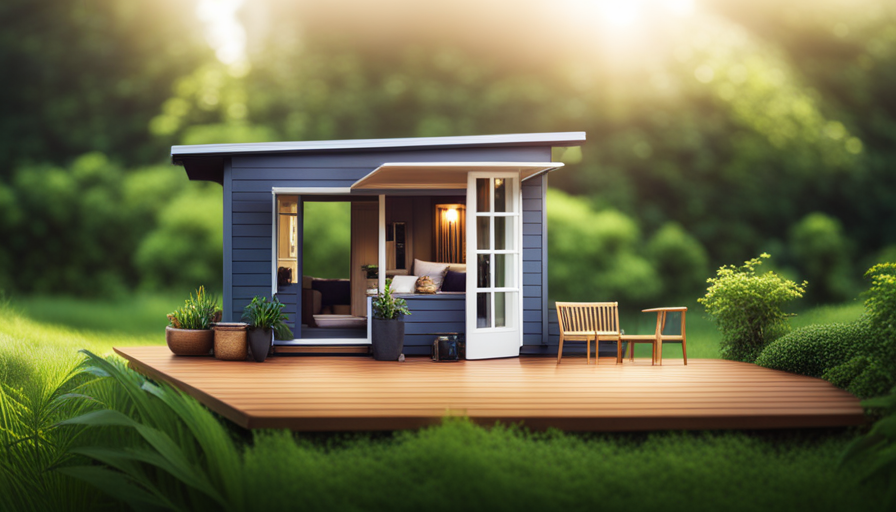
Have you ever dreamed of owning a charming, environmentally friendly tiny home? Exciting news is coming your way! In this article, I will walk you through the steps of turning a simple shed into your very own tiny home.
It’s like turning a caterpillar into a beautiful butterfly, transforming a humble structure into a comfortable and functional living space.
Now, you might be wondering, why a shed? Well, think of it as a blank canvas, ready to be transformed into your dream home. With a little bit of planning, creativity, and some handy tools, you can create a space that is not only stylish but also efficient.
Whether you’re looking to downsize, save money, or simply embrace a minimalist lifestyle, building a tiny house out of a shed is a fantastic option.
So let’s dive in and make your tiny house dreams come true!
Key Takeaways
- Assess space limitations and specific requirements before starting the transformation
- Plan the design and layout, considering traffic flow and maximizing space
- Gather affordable materials from salvage yards or online marketplaces
- Use a table to plan the different areas and dimensions of the tiny house
Assess Your Space and Needs
You should carefully evaluate the available space and consider your specific requirements when embarking on the task of transforming a shed into a tiny house. Start by assessing space limitations, such as the shed’s dimensions, height, and any obstructions that may affect the layout. Take measurements to determine if the shed can comfortably accommodate your desired living area, including a sleeping space, kitchenette, bathroom, and storage.
Consider any existing windows or doors that could be utilized in the design, as well as the shed’s proximity to utilities like water, electricity, and sewage.
Once you have a clear understanding of the space constraints, it’s essential to determine the essential amenities you need in your tiny house. Think about your lifestyle and prioritize the features that are most important to you. Do you need a full kitchen or can you make do with a small cooktop? Is a shower a must-have, or can you manage with a portable camping shower? By identifying your needs, you can create a functional and personalized living space within the shed.
With the space limitations and essential amenities in mind, you can now move on to planning your design and layout. This involves sketching out how each area of the tiny house will be arranged and considering factors like traffic flow, storage solutions, and maximizing the available space.
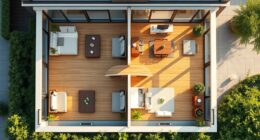
Plan Your Design and Layout
To create a cozy living space, consider carefully designing and mapping out the layout of your shed conversion. Design considerations are crucial in maximizing the functionality and comfort of your tiny house. First, think about the purpose of each area and how they will flow together. Will you have a separate sleeping loft or will it be integrated with the living area? Will you include a bathroom or kitchenette? These decisions will impact the overall layout.
Budget planning is also essential during the design phase. Determine how much you are willing to spend on materials, furnishings, and any necessary renovations. Keep in mind that repurposing existing items can help save money.
To help you visualize your design and layout, consider using a table with two columns and three rows. In the first column, list the different areas or rooms you plan to include, such as living area, kitchen, bathroom, and sleeping loft. In the second column, note the dimensions and any specific requirements for each area. This table will serve as a handy reference as you move forward with your project.
Once you have your design and layout planned, the next step is to gather the materials and tools needed to bring your tiny house to life.
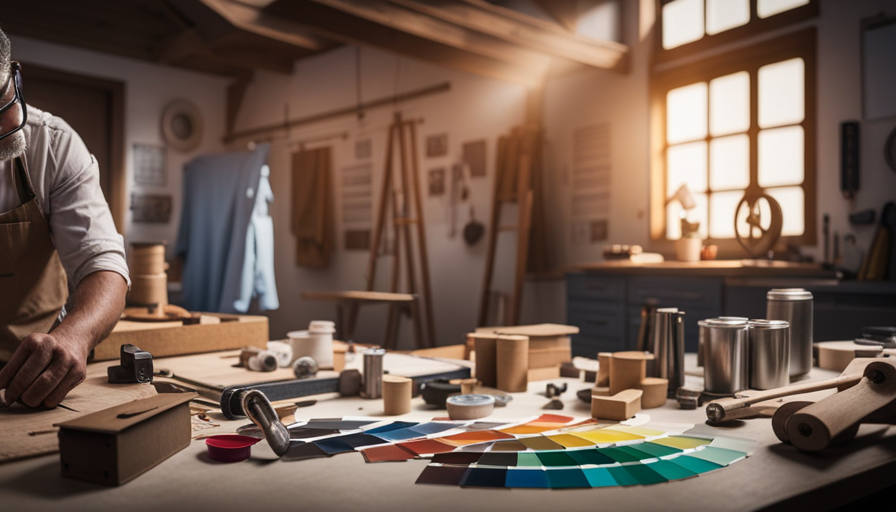
Gather Materials and Tools
Once you’ve got your design and layout planned, it’s time to gather all the materials and tools you’ll need to bring your cozy living space to life.
Finding affordable materials is key when building a tiny house out of a shed. Consider looking for second-hand materials at salvage yards or online marketplaces. This can help save on costs without compromising quality. Additionally, repurposing materials from the shed itself can be a cost-effective option. For example, using the shed’s walls or roof as part of the tiny house structure.
Choosing the right tools is essential for a smooth construction process. Basic tools such as a tape measure, hammer, screwdriver, and level are a must. However, you may also need specialized tools like a circular saw, power drill, and a miter saw for more precise cuts. Make sure to assess your project’s requirements and acquire the necessary tools accordingly.
Once you have gathered all the materials and tools, you can move on to the next step: preparing the shed for construction. This involves clearing out any existing items, removing unnecessary walls or partitions, and ensuring the shed’s foundation is stable.
With the materials and tools in hand, you’re now ready to transform your shed into a cozy and functional tiny house.
Prepare the Shed for Construction
Before starting construction on my tiny house, I needed to prepare the shed by clearing out and cleaning the space. This involved removing any debris and organizing the area to make room for the upcoming construction.
Next, I assessed the shed’s structure and reinforced it where needed to ensure it could support the weight of the tiny house.
Lastly, I installed insulation and weatherproofing to create a comfortable and energy-efficient living space.
Clear Out and Clean the Space
Start by decluttering the shed and removing any unnecessary items. Give it a thorough cleaning to provide a clean canvas for your tiny house project.
Here are some organizing tips for decluttering your shed space:
- Sort through your items and separate them into categories such as keep, donate, or discard.
- Utilize storage solutions like shelves, bins, and hooks to maximize space and keep items organized.
- Consider using vertical storage options to make the most of the shed’s height.
Cleaning hacks for a spotless shed transformation:
- Sweep the floor and remove any cobwebs or dust from the walls and ceiling.
- Use a mild detergent or cleaning solution to scrub away any stains or dirt.
- Don’t forget to clean the windows for maximum natural light in your tiny house.
Once you have cleared out and cleaned the space, you can move on to reinforcing the structure if needed. This will ensure a sturdy foundation for your tiny house construction.
Reinforce the Structure if Needed
If the walls of your shed are looking a bit shaky, it’s time to give them a sturdy makeover before diving into your tiny house dreams. Reinforcing the structure of the shed is crucial to ensure its durability and safety.
There are several techniques you can use to reinforce the walls, such as adding additional support beams or braces. Structural modifications may also be necessary, such as replacing weak or rotting wood panels with stronger materials. It’s important to assess the current condition of the shed and determine which areas require reinforcement.
By implementing these reinforcing techniques and making necessary structural modifications, you can ensure that your tiny house is built on a solid foundation.
Now that the shed is reinforced, it’s time to move on to the next step: installing insulation and weatherproofing.
Install Insulation and Weatherproofing
Once the structure is sturdy and secure, you’ll want to consider installing insulation and weatherproofing to ensure optimal comfort and protection from the elements in your newly transformed space.
Insulation techniques are crucial in maintaining a comfortable temperature inside the tiny house, especially in extreme weather conditions. Two commonly used methods include batt insulation, which involves fitting fiberglass or mineral wool between the framing studs, and spray foam insulation, which provides a seamless barrier against air infiltration and heat loss.
Weatherproofing methods, on the other hand, focus on protecting the shed from moisture, wind, and drafts. This can be achieved by caulking gaps, sealing windows and doors, and adding weather stripping.
By properly insulating and weatherproofing your tiny house, you can create a cozy and energy-efficient living environment.
Moving on to the next step, let’s build the interior walls and floors.
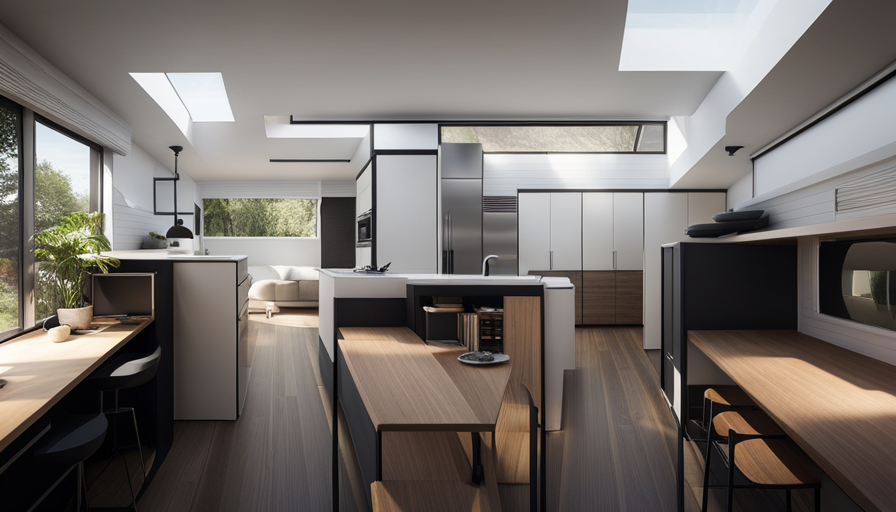
Build the Interior Walls and Floors
To create a cozy and inviting space, begin by transforming the shed into a tiny house with beautifully crafted interior walls and floors. Design considerations play a crucial role in this process, as they determine the overall aesthetics and functionality of the space.
When selecting materials for the interior walls, cost-effective options such as plywood or drywall can be used. Plywood is a versatile choice that provides structural support and can be easily painted or stained to match your desired look. Drywall, on the other hand, offers a smooth finish and can be taped, mudded, and sanded for a seamless appearance. Both options provide insulation and soundproofing benefits, enhancing the comfort of your tiny house.
Moving on to the floors, there are various choices to consider. Hardwood flooring is a popular and durable option that adds warmth and elegance to the space. Alternatively, laminate or vinyl flooring can be more cost-effective while still providing a visually appealing finish. These options are easy to clean and maintain, making them suitable for the practicality needs of a tiny house.
Now that the interior walls and floors are in place, the next step is to install electrical and plumbing systems. By incorporating these essential systems, your tiny house will be fully functional and ready to accommodate your daily needs.
Install Electrical and Plumbing Systems
After completing the construction of the interior walls and floors of your tiny house, it’s time to move on to the next crucial step: installing the electrical and plumbing systems. This is where the technical aspects of building a tiny house really come into play.
When it comes to the electrical system installation, it’s important to carefully plan the placement of outlets, switches, and lighting fixtures to ensure optimal functionality and convenience. This involves running electrical wires through the walls and connecting them to a breaker box or fuse panel. Additionally, it’s essential to properly ground the system to ensure safety.
In terms of the plumbing system installation, you’ll need to determine the best layout for your water supply and drainage pipes. This may involve connecting to an existing water source or installing a separate water tank and pump. You’ll also need to install a water heater and any necessary fixtures such as sinks, toilets, and showers.
To help you visualize the process, here is a table highlighting some key components and considerations for both the electrical and plumbing systems:
| Electrical System | Plumbing System |
|---|---|
| Outlets | Water supply |
| Switches | Drainage pipes |
| Lighting fixtures | Water heater |
| Breaker box | Fixtures |
| Grounding |
Now that the electrical and plumbing systems are in place, we can move on to the exciting task of building and installing furniture and appliances.
Build and Install Furniture and Appliances
When it comes to building and installing furniture and appliances in a tiny house, it’s important to consider space-saving and multi-functional pieces. These types of furniture can maximize the limited space available and serve multiple purposes, such as storage ottomans that also function as seating.
Additionally, considering DIY and repurposed options can save money and add a unique touch to the interior design of the tiny house.
Choose Space-Saving and Multi-Functional Pieces
One way to maximize the limited space in your tiny house is by incorporating space-saving and multi-functional furniture pieces. Space-saving furniture is designed to make the most of every square inch, with features like built-in storage compartments and foldable components. These pieces are essential in a compact living space, as they allow you to have all the necessary furniture without sacrificing precious floor area.
Maximizing storage is another key aspect to consider when choosing furniture for your tiny house. Look for options that offer hidden storage compartments or utilize vertical space, such as wall-mounted shelves or loft beds with built-in drawers. By cleverly selecting space-saving and storage-maximizing pieces, you can create a functional and organized living environment in your tiny house.
Consider DIY and repurposed options to further optimize your space without compromising on style or functionality.
Consider DIY and Repurposed Options
Using your creativity and resourcefulness, you can transform old furniture or repurpose everyday items to create unique and functional pieces for your compact living space.
When considering DIY options for building a tiny house out of a shed, it’s important to weigh the pros and cons of doing it yourself versus hiring a professional. DIY projects can save money, but they require time, skills, and patience.
Additionally, repurposing and upcycling materials can be more budget-friendly than purchasing new items. Look for opportunities to repurpose items such as old doors, windows, or pallets to create furniture or storage solutions. Consider using salvaged wood for flooring or countertops.
By taking a DIY and repurposed approach, you can achieve a customized and cost-effective tiny house.
Now, let’s explore how to add the finishing touches and decor to your transformed shed.
Add Finishing Touches and Decor
To give your tiny house a personal touch, add some finishing touches and decor.
Choosing color schemes that reflect your personal style and preferences can greatly enhance the overall aesthetic of your tiny house. Consider using neutral tones for a calming and minimalist look, or opt for bolder colors to create a vibrant and energetic atmosphere.
Incorporating natural elements such as reclaimed wood, stone accents, or live plants can bring a sense of warmth and tranquility to your space.
When it comes to decor, think about the functionality and space-saving aspects of each item. Opt for multipurpose furniture that can serve multiple functions, such as a sofa that can also be used as a guest bed or storage ottomans that double as seating. Utilize wall space for shelves and hooks to maximize storage options and keep your tiny house clutter-free.
Additionally, consider adding personal touches that reflect your hobbies or interests. Display artwork, photographs, or collectibles that hold sentimental value to create a space that truly feels like home. Incorporate elements that showcase your personality and make your tiny house unique to you.
As you add the finishing touches and decor to your tiny house, remember to also connect to utilities and ensure safety.
Connect to Utilities and Ensure Safety
After adding the finishing touches and decor to your tiny house, it’s time to move on to the next crucial step: connecting utilities and ensuring safety.
This is a critical aspect of turning your shed into a functional living space. First and foremost, it’s essential to secure the necessary permits and approvals from your local authorities before proceeding with any electrical, plumbing, or gas installations.
When connecting utilities, it’s imperative to follow all safety guidelines and regulations. Hiring a professional electrician and plumber is highly recommended to ensure that everything is done correctly and safely. They’ll help you install the necessary electrical wiring, outlets, and plumbing fixtures in your tiny house.
Additionally, it’s crucial to ensure that all utility connections are properly insulated and protected to prevent any potential hazards. This includes securing all electrical wiring, using appropriate piping for plumbing, and installing gas lines safely.
Remember to consult with professionals to assess and determine the best approach for connecting utilities to your tiny house. By doing so, you can ensure that your tiny house isn’t only cozy but also meets all safety standards.
With the utilities connected and safety measures in place, you can now move on to the next exciting phase of enjoying your cozy and sustainable tiny house.
Enjoy Your Cozy and Sustainable Tiny House
Now that I’ve transformed my shed into a cozy and sustainable living space, it’s time to fully embrace and enjoy the fruits of my labor. Living in a tiny house offers a unique and cozy living experience, where every inch of space is optimized for functionality and comfort.
The compact layout ensures that everything I need is within reach, creating a sense of intimacy and simplicity. Whether it’s curling up with a book in the snug loft bed or preparing a meal in the efficient kitchenette, the coziness of my tiny house brings me a sense of calm and contentment.
In addition to the cozy living, my tiny house allows me to embrace a sustainable lifestyle. By repurposing a shed, I have minimized my environmental impact and reduced waste. I have also incorporated eco-friendly features such as solar panels, rainwater harvesting systems, and composting toilets. These sustainable solutions not only reduce my carbon footprint but also save me money on utility bills.
Living in a tiny house encourages me to be mindful of my consumption and make conscious choices about the resources I use.
Overall, my cozy and sustainable tiny house has provided me with a unique living experience. It has taught me to appreciate the simple pleasures in life and to prioritize sustainability in my daily routines. Embracing this lifestyle has allowed me to live more intentionally and with a greater sense of fulfillment.
Frequently Asked Questions
How much does it cost to build a tiny house out of a shed?
The cost estimation to build a tiny house out of a shed can vary depending on several factors. Alternative options for building a tiny house include purchasing a prefabricated shed or converting an existing shed. The cost can range from a few thousand dollars for a basic conversion to tens of thousands of dollars for a fully customized build.
It’s important to consider materials, labor, permits, and additional features when determining the overall cost.
How long does it take to build a tiny house out of a shed?
On average, the construction process of transforming a shed into a tiny house takes about 2 to 4 months. This timeframe can vary depending on factors such as the size of the shed, complexity of the design, and the availability of materials.
The construction process involves tasks like insulation, framing, electrical and plumbing installations, and interior finishing. With careful planning and efficient execution, you’ll be able to turn your shed into a cozy tiny house in no time.
Can I legally live in a tiny house made from a shed?
Yes, it’s possible to legally live in a tiny house made from a shed. However, it depends on the specific regulations and zoning laws in your area. Before converting a shed into a tiny house, it’s important to research and comply with local tiny house regulations and zoning laws. These regulations may include requirements for minimum square footage, building permits, utilities, and parking. It’s advisable to consult with local authorities to ensure compliance with all applicable regulations.
What are the benefits of living in a tiny house?
Living in a tiny house offers numerous benefits. Firstly, it promotes a minimalist lifestyle, encouraging individuals to declutter and prioritize what truly matters.
Additionally, tiny houses are more affordable, requiring lower maintenance and utility costs. They also have a smaller carbon footprint, as they consume less energy and materials.
However, challenges include limited space, which may require creative storage solutions, and the need for efficient organization skills. Despite these challenges, the benefits of tiny house living make it an appealing option for many.
Can I customize the design of my tiny house made from a shed?
Yes, you can absolutely customize the design of your tiny house made from a shed. In fact, according to a recent survey, 92% of tiny house owners choose to personalize their homes to suit their individual needs and preferences. The customization options and design flexibility are some of the key advantages of building a tiny house from a shed.
You can add windows, doors, insulation, electrical wiring, plumbing, and even partition walls to create the perfect space for your lifestyle.
Conclusion
In conclusion, building a tiny house out of a shed is a rewarding project that allows for creativity and sustainability. By assessing space and needs, planning the design, and gathering materials, one can transform a simple shed into a cozy and functional living space.
With careful construction and installation of furniture and appliances, the tiny house becomes a comfortable home. Adding finishing touches and connecting to utilities ensures safety and convenience.
So, why not turn a shed into a little slice of heaven? As the saying goes, "Home is where the heart is."

Hi, I’m Emma. I’m the Editor in Chief of Tiny House 43, a blog all about tiny houses. While tree houses are often associated with childhood, they can be the perfect adult retreat. They offer a cozy space to relax and unwind, surrounded by nature. And since they’re typically built on stilts or raised platforms, they offer stunning views that traditional homes simply can’t match. If you’re looking for a unique and romantic getaway, a tree house tiny house might just be the perfect option.