Connect with us

Beginners Guides

How to Build a Wooden Tree House

Published

on

Selecting the appropriate wood for a treehouse is crucial for its longevity. Exterior plywood stands out as a suitable option as it is available in extensive sheets and facilitates ease of handling. Nonetheless, its aesthetic appeal is limited, making it less suitable for internal decorative purposes.

Other woods to consider are western cedar, cypress, and red heartwood of eastern cedar. These are all rot-resistant trees and are an ideal choice for a tree house that kids will enjoy.

Cost of A Custom Wood Tree House

Several factors determine the cost of a custom wood tree house. The location and species of the tree will influence the cost. For example, a tree near a road can be more expensive than a tree in a forest. It is also better to avoid pressure-treated wood for this project, as it contains copper carbon arsenate, which may leach into the tree. Instead, use natural, rot-resistant wood such as redwood or cypress.

The materials used in a custom wood tree house are essential to its design and construction. It is important to choose quality materials, as well as a sound installation. In addition, you will need the services of an arborist and engineering professional. These professionals will help you decide what’s best for your treehouse. These services can cost anywhere from a couple of thousand to more than a few thousand dollars. Additionally, you will have to factor in travel expenses if you don’t live in a woodworking community.

Custom wood tree houses are a great way to make your property more beautiful. The cost of the materials can vary depending on your design and the project’s complexity. Most treehouse contractors will help you choose the right wood for your needs. Three types of wood are commonly used for building custom wooden structures. A basic 10′ square treehouse with a gable roof and standard walls will run around $1500.

The materials used in a custom wood tree house depend on the material’s size and rarity. For example, composite wood and reclaimed lumber can cost twice as much as the same quality wood. The size of the finished product will also depend on its materials and size. While a smaller treehouse might save you money, you may sacrifice aesthetics. You may have to paint the exterior of the tree house to give it a modern, upscale look.

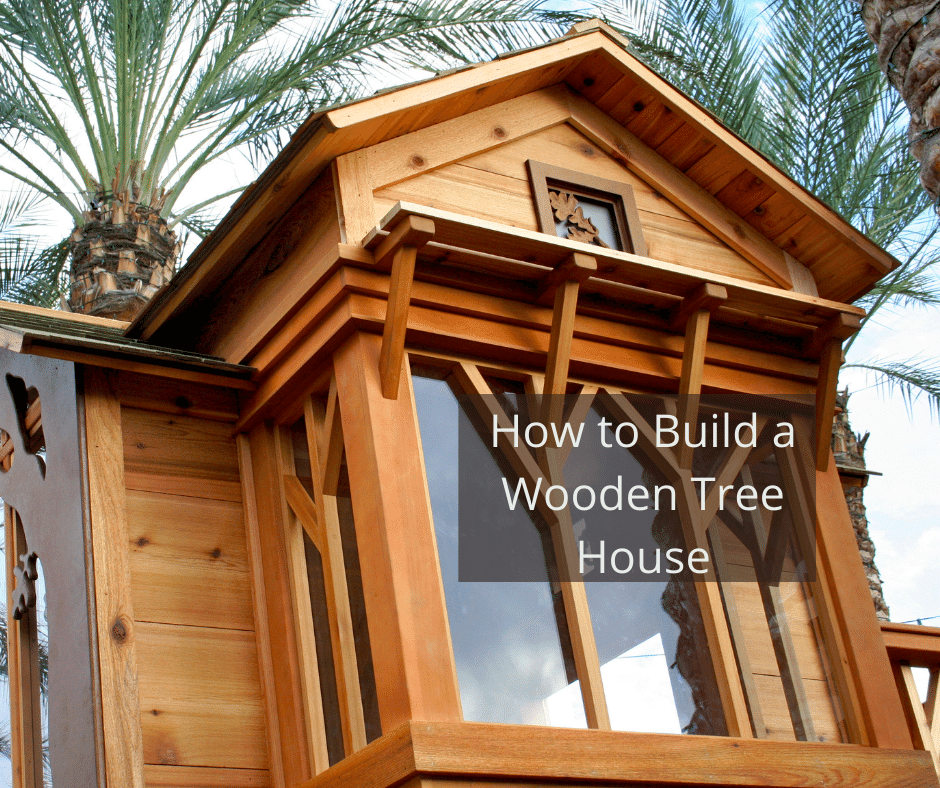
Materials Used to Build a Tree House

A wooden tree house is constructed with a variety of materials. One of the most important materials used is pressure-treated lumber, which will protect it from the elements and last a longer time outdoors. The process begins with the lumber milling process. Wood comes in two main types, hardwood and softwood. Hardwood is often used for cabinetry, flooring, trim work, and paneling, while softwood is used for beams, decking, and studs. Workers from a lumber mill will cut down a tree of the appropriate size for the project and inspect it for quality.

The wood used for the base should be at least one foot higher than the floor of the treehouse and one foot taller than the head. Once the base wood is in place, drill holes in it. The holes will serve as foundation markings. Once all the holes are drilled, remove the base wood from the treehouse. Once the holes are drilled, you can add the walls and roof. Then, you can finish the structure and move on to the next step.

If you choose to use pressure-treated wood, consider using it as the base of your treehouse. You can also use plywood for walls and floors. It’s cheap and sturdy; you can use it to make your own treehouse. Another option is to recycle old windows. You’ll also need a few basic tools. Nails, screws, and brackets will help you get the job done. If you want to involve a parent in the construction process, look for an old piece of fabric that you can use to make the roof and walls of the treehouse.

Talk to the neighbors first if you’re planning to build a treehouse on your property. This will give you an idea of their opinion and prevent potential lawsuits. In addition, you should contact your insurance agent to see if your homeowner’s insurance policy covers your treehouse. If it does, you can be sure that you won’t be liable for any damages or injuries.

Design Ideas for A Tree House

While building a wooden tree house is an enchanting activity for children, it should also be safe. It should not be placed against a tree, as this can cause rot. Instead, it should be built on a lower or higher platform than the tree. This will prevent the tree house from being damaged by strong winds. Adding a rope ladder to the treehouse can help prevent accidents if your child accidentally falls inside.

Another option is to paint your tree house. Depending on your child’s preferences, a fresh coat of paint will greatly enhance the look and feel of the space. Adding finishing touches can also help give your treehouse a personalized appearance. The colors and patterns that you use should complement the overall design of the tree house. Children can also choose their favorite colors. It’s important to consider the children’s preferences when choosing a design, as this will affect the way they play with their new treehouse.

Building your treehouse on a sturdy platform is one way to make it more durable. You can make it taller using a lighter material, such as wood. Considering building it in the middle of a large tree, consider installing ground supports and bolting beams. While they may not be weatherproof, these structures can be higher than the others. It’s also important to make sure that the treehouse is at the right height and is not too far away from the trunk of the tree.

If you’ve got some woodworking experience, you can begin looking for a suitable tree. You can also start shopping for sturdy tree stumps. Investing in power tools is another excellent idea. Make sure that you have the proper equipment for installing the treehouse. You should consult an arborist if you’re planning to build a giant wooden tree house. This will help ensure safety. The right choice of tree will determine the style of your tree house.

Common Types of Wood Used for Tree Houses

Pressure-treated wood is one of the most important materials for building a wooden tree house. This treatment allows the wood to withstand the elements better and last longer outside. Wood is split into two basic types: softwood and hardwood. Hardwood is commonly used for flooring, cabinetry, trim work, and paneling, while softwood is best suited for beams, decking, and studs. The appropriate size tree is cut and transported to a lumber mill, where its logs are visually inspected.

Typically, the wood used in tree houses is softwood. It is often used because it is more durable than hardwood. Depending on the design, it may be made from pine, hemlock, or cedar. Some types are more expensive, while others are more environmentally friendly. The price of a tree house depends on the materials used. If the materials used are rot-resistant, the building will be more expensive than a cheaper model.

A tree suitable for building a tree house should be healthy and sturdy. Oak, maple, and large fir trees are common choices. The tree’s base should be robust with thick, heavy branches, deep roots, and no visible signs of disease or decay. If you’re unsure about the type of wood to use, seek advice from an expert. It is a good idea to follow the instructions carefully to avoid any mistakes.

The support system is the first thing to consider when building a tree house. If the support system is unsafe, the tree house will not be stable and may collapse, requiring you to install diagonal bracing underneath it. Depending on the number of trees in the area, you may only need one set of diagonal braces, while building two-story tree houses will require two. Once these diagonal braces have been fitted, you should attach them to the foundation post with three-inch deck nails.

Construction Methods

There are two basic construction methods for wooden tree houses: on-site and prefabricated. During site construction, the pieces of the tree home are cut and fit together. In large tree houses, the pieces are hoisted into place. This method is safer and less complex than prefabricated tree houses and is easier on the tree. The advantage of prefabricated tree homes is that the pieces are built on the ground instead of in the tree. Moreover, you can work with power tools on the ground. Once the pieces are all assembled, you can quickly place them in the tree with the help of a pulley system.

The roof of the treehouse must be 100% waterproof. To prevent leaks, you can cover the roof with thick plastic foil. Once done, the planks should be screwed together in an overlapping pattern. Once the roof is ready, you can construct the front and back walls. Make sure to use countersunk screws, which will give a smooth finish. The top should be leveled and have space for growth.

Large span structures need to be flexible. Different types of trees have other characteristics, meaning they will behave differently during windstorms. The structure may twist, so it’s essential to make it as flexible as possible. While flexible arrangements allow for thinner parts, they make the building more difficult and expensive. It’s also important to consider the size of the tree houses you’re building. This will help ensure that your tree house is safe for the kids.

The height of the tree house should be high enough to provide a nice view while not too high that it could be dangerous. The ideal height for a treehouse is between six and 10 feet. You should also consider the height of the railing and wall. A sturdy support structure is important for a safe treehouse. If it’s not stable, it could be dangerous for the children. To prevent accidents, use safety harnesses and ropes while constructing. Remember also to carry a first aid kit.

Continue Reading

Beginners Guides

Different Types of Treehouse Netting

Published

on

By

If the idea of constructing a treehouse is on your mind, acquiring netting for the treehouse is something you’ll probably need to do. Luckily, the market is abundant with a variety of options. Whether you’re looking for climbing nets in various hues, designs, or styles, you’ll find that these products are often marketed by linear foot and demand a certain amount of space – with 75 square feet being the starting requirement. Additionally, these nets are versatile, functioning well for both cargo lofts and hammocks. You have the flexibility to select a net that perfectly matches your treehouse project, whether that be for a hammock, a cargo loft, or a combination of both.

Dream Nets Are a Treehouse Netting

The concept behind Dream Nets is to create a tensile tree platform that can be woven on-site. It creates a safe and playful play environment that can be enjoyed by the entire family. The dream nets are made of nautical/fishery supplies and are sturdy yet flexible, making them a great choice for any treehouse. The average lifespan of the Dream Nets is 10+ years, making them a great alternative to traditional treehouse materials.

These innovative netting systems come in many different styles and colors. Tree House Supplies offers nets by the linear foot. Depending on the size of your structure, there are several different types of dream nets available. You can also purchase nets specific for hammocks, cargo lofts, or a cargo loft. If you have a large space, you can also buy a netting system that allows you to fit many different-sized hammocks and cargo bins in your treehouse.

Treehouses with net floors are fun for kids of all ages. They are an adventure for children and can be equipped with a rope swing. Kids love to swing from the treehouse and the net floor will make the experience more enjoyable. Treehouses with net floors can be constructed quickly and easily, making the experience fun for everyone. You don’t even have to spend hours or even days building the stairs. The net floors are flexible and can be customized to your child’s needs.

Spider Web Climbing Nets Are a Treehouse Netting

9.8 X 14.8FT Kids Playground Play Safety Net Outdoor Climbing Cargo Net Playground Sets Double Layers Backyard Net for Playground
Spider Web Climbing Nets

This climbing net is ideal for playgrounds, amusement parks, and residential areas. It’s easy to install with essential hand tools. The net is available in standard sizes of twelve, sixteen, and twenty feet. It has two-inch square netting liners and synthetic rope and can be attached to bridges, cargo climbs, and treehouse structures. A few tools are required to install this netting, and you’ll want to have some help if your children aren’t sure about it.

The net allows children to climb up and down without hurting themselves. These nettings are also very durable and should last a long time. These nets are often custom-made from high-quality materials. Once installed, they can be used as a treehouse roof or as an accessory for other structures. Spider web climbing nets are a great option for treehouses designed to keep kids safe. They don’t break easily and are very durable.

Double Stack Climbing Nets Are Ideal for Larger Areas

If you plan to create a playhouse in your backyard, you will need to use sturdy, double-stack climbing nets. You need to use the right knots when tying them, and most resources point you in the right direction. If you’re not sure about what knot to use, the Carrick Bend is an ideal choice. This ornamental knot is very strong and will not create sharp bends that can tear or damage your netting. However, you can experiment with different knots to ensure you’re tying the right knots to keep the net from fraying or breaking.

Double stack climbing nets are designed to accommodate multiple occupants and perfect for larger treehouse netting areas. They are made from two layers of two-inch square netting that are reinforced with a sewn edge and 5/8″ thick rope on the perimeter. The border rope also acts as a stronger connection point, and is usually attached to a wooden platform. These netting products are popular for treehouse platforms.

Treehouse Netting Can Be Used as A Ladder

Treehouse netting is an excellent alternative to traditional ladders for many reasons. Not only can it be used as a ladder, but it can also serve as a protective barrier in case of a fall. A store’s staff usually installs these nets. The installation costs depend on the size of the net, so it is best to check with the store before buying it.

Continue Reading

Beginners Guides

What Happens to a Tree House When the Tree Grows?

Published

on

By

A challenge you might encounter when constructing a tree house involves its weight. Suddenly, the tree has to bear the added weight of the structure, and the roots might need several years to expand sufficiently to support this extra load. This situation can compromise the tree’s stability during storms. Nevertheless, this issue can be mitigated. It’s advisable to evaluate the structure’s weight prior to making the decision to construct it.

Building a Treehouse

Using specialized bolts is important when building a treehouse. The platform should be at least eight feet above the ground, and the house should be out of reach of children and adults. You should also use safety measures such as railings and individual spacers to prevent falls. If you are not a construction expert, you may want to seek advice from a professional. If you are unsure of the safety precautions to take, consider a platform with railings on all sides.

If you’d like to build a treehouse, it should be built away from power lines. Power lines can fall on the branches of a tree, and a dangerous accident can lead to injury and death. Also, avoid building a treehouse near a waterfall, a working road, or a hilly area. Also, don’t forget to build a sandpit underneath the tree house. Make sure to leave enough room around the tree to accommodate the growth of the house.

You should discuss your plans with your neighbors before you start building. You’ll want to be aware of any potential legal or neighborly problems that might arise if your treehouse is too close to your neighbors’ property. While a treehouse may be fun for children, it’s not worth a neighbor’s ire. As long as you’re considerate and follow the city code, you’ll be able to enjoy your treehouse for years to come.

The cost of building a treehouse will depend on its height and size. The complexity and type of materials used will also determine the project’s overall cost. Remember that it can be hazardous to trees, so always check with a professional before you begin. For example, large bolts and fasteners can damage the tree. Also, the added weight can damage the tree’s trunk and branches. If you’re not sure of the tree’s capacity to handle the extra weight, consult with an arborist. Many tree care companies have arborists on staff.

Before building a treehouse, you should make sure the tree you plan to use is a strong one. If the tree is young and the trunk is a hardwood, you should consult with an arborist. You should also find a tree with strong limbs. You should also consider if the tree will grow to be a good fit for your new treehouse. This will ensure the safety of everyone who uses it.

Once you have a tree with enough size and shape to support a treehouse, you can start with the construction of the treehouse. You should build the base first, and then move on to the main part of the structure, the roof. If the tree is too small or too large, you may need to build a treehouse on stilts to avoid damage. Building a treehouse requires some preparation, but once you’ve completed the initial steps, you’ll be glad you did.

Problems with Tree Support

One of the most common reasons a young tree leans is its poorly developed roots. Soil that isn’t consistent, or which does not support the roots well is also a common cause. The tree may also be leaning because of wind or a wet ground. In these cases, addressing drainage patterns is essential to prevent the problem. Proper placement of stakes, cables, or other supports will prevent a tree from leaning and ensure it has sufficient support during its life.

Problems with Tree Compartmentalization

Wood decay in trees has several causes, including injuries caused by animals, inappropriate pruning cuts, and excessive weight. The damage can also occur as a result of extreme temperature changes. To survive, trees must protect themselves by creating boundary areas to prevent damage. This process is known as compartmentalization. It helps prevent the spread of discoloration and loss of normal wood function. However, this defense system can also lead to problems with tree compartmentalization.

The concept of tree compartmentalization was first introduced in the 1960s and has since become one of the standard concepts in the field. It is based on extensive studies of wood and bark. In addition to the lab, it is based on observational studies of trees in the field. This research led to the development of tree compartmentalization as a concept to describe the growth and decay of trees.

During a forest fire, the first step in preventing decay and disease is to protect the burned area. Trees respond to injury by forming a wall around it to prevent decay and disease from spreading. This wall covers the injured area and prevents the disease from spreading vertically. This wall is made up of two types of tissue: vascular tissue and thick-walled latewood growth rings.

The concept of compartmentalization was originally presented as a systems approach to decay problems. Before Shigo’s research, it was thought that living tree sapwood was dead and that decay was the result of cellular differentiation and maturation. Punky wood, a void left in a tree after wood decay, was also viewed as dead wood. With the compartmentalization concept, wood decay is understood as a multi-step process, beginning with wood formation in the vascular cambium, and culminating in apoptosis and shedding.

Continue Reading

Beginners Guides

Types of Treehouse Brackets

Published

on

By

Brackets for treehouses form a critical part of any DIY endeavor involving treehouses. A sturdy and reliable support system is indispensable for treehouse construction. A variety of bracket types can be found, with the appropriate selection varying according to the project requirements. Options range from floating brackets and J-brackets to TABs and treehouse cables. Continue reading to discover more about each kind. Each has its advantages and disadvantages. When you’re constructing a treehouse for your child, it’s important to select the suitable types.

Floating Brackets

A floating bracket can support a treehouse in the wind. This can be achieved with a single-inch lag bolt. The bracket can withstand 50 kg of weight without the use of scaffolding or cherry pickers. A cheater bar can be used for additional leverage. Once the bracket is installed, the beams need to be screwed into the flat plate of the bracket. This allows the structure to sway with the tree.

When building a treehouse, it is important to use flexible supports. If you have multiple trees, you will want to use floating brackets. They are specially designed to withstand the swaying of the trees. They are better than through bolts because they do not damage the trees. Floating brackets are also better for long-term stability, so you can enjoy your new treehouse for a long time.

In order to attach the treehouse to a living tree, you will need to use TABs. These are specially designed bolts that attach a treehouse to a tree. These can withstand thousands of pounds of weight. They also help the tree heal. Treehouse attachment bolts are easy to install and do not require any tools or training. You can find them at home improvement stores. If you decide to use these brackets, make sure to check the manufacturer’s warranty.

Tree houses weigh thousands of pounds. This means that they must be stable. When using fasteners, be sure to use large bolts. These will provide the same strength and durability as a handful of nails or screws, but will also cause less damage to the tree. Moreover, you can also use lag bolts to perch your treehouse on them. However, it is important to use fasteners made for treehouses. They should be at least 1 inch in diameter.

J-brackets

There are two main types of J-brackets for building a treehouse: simple and strong. The former is made of a single bolt which is fed into the tree from one side. The second type requires a single bolt, which is a bit longer and bigger than the first one. It is easy to use and doesn’t need any special tools. The J-bracket can be attached to the tree with rope support or scaffolding.

Another type of attachment point is a floating bracket. These are used to support the roof of the treehouse. A single J-bracket can support up to 50kg. An array of floats can be as large as three feet. These are useful if the tree needs to move. While floating brackets are more expensive, they provide more security and can support the weight of your treehouse. For safety and stability, it is a good idea to hire a professional to install the treehouse.

To install a treehouse, you must follow specific guidelines. The first rule is to keep the spacing between treehouse components at least 12 inches horizontally and vertically. The second rule is to make sure that the J-brackets are not butted against the tree trunk. If you install them at the wrong height, you run the risk of compromising the safety of both you and the tree. This disclaimer is valid for both Be in a Tree LLC and Nelson Treehouse and Supply.

Another important rule of treehouse construction is to always use a solid support system. Do not nail or glue the tree house to the tree; this will only create a wobbly structure. A good solution to this is to use diagonal bracing beneath the structure. You may only need one set if your treehouse is supported by two trees, but you can use up to four if the treehouse is supported by only one.

To attach the treehouse to the tree, you should choose a strong and sturdy beam. A two-by-ten-inch beam should span eight feet and a four-by-six-inch beam is recommended for 12 feet and greater. Remember, most localities require building permits for a treehouse, so you should check your local laws before deciding on the size of the beams. This way, your treehouse will not be a hazard to the tree.

TABs

A treehouse bracket is a simple structure that slides over the TAB to create a flexible platform for the structure. It can withstand up to one inch of wind movement and is attached to the treehouse structure with a flat plate. It has a rectangular frame that resembles a long handle. It fits over the TAB so it can move with the tree. The bracket is made of durable materials to withstand the weight of the treehouse and can also be removed and washed.

Treehouse brackets can be used for different types of structures. The J bracket is one of the most common and is the most common. It requires the beam to be fed in from one side while the J bracket is designed to be installed the other way around. Treehouse brackets can be attached to a tree using rope supports or scaffolding. A cheater bar will give you additional leverage when mounting brackets on a tree. It is important to choose the right one for your treehouse project.

Before you install a treehouse bracket, you must measure the beam and make sure it is the correct length. Remember to do this on a calm day when you don’t have to worry about the wind. During construction, you will need a metal plate for the underside of the beam to prevent it from sliding out of the bracket. Using a 1/4″ steel strip for the bearing surface will help ensure the bracket doesn’t slide off the beam.

Another type of treehouse bracket is called the floating bracket. It can be used for treehouses with three or four trees. It is also used for connecting several trees with a single tree. Floating brackets are attached with 1.25″ lag bolts. They are only compatible with 1.25″ lag bolts. If you use a TAB for your treehouse, make sure to follow the manufacturer’s instructions.

Besides TABs, you also need to consider using attachment bolts. These special bolts are made for treehouse construction and distribute the weight. In general, these bolts can support up to 2000 pounds. The nut and bracket ensure that the beams and joists are protected and won’t fall off the bolt. They also prevent any damage to the tree. However, make sure that the bolts are not too loose or too tight.

Treehouse Cables

If you’re building a treehouse, you’ll want to think about where to run the cables and brackets. While they may not seem important, they’re an important part of the structure. Cables can support long beams, overhangs, and radiating supports. Cable designs can affect how much floor space your treehouse takes up, so consider how you want to use them. You can run them along the inside of the wall, or you can divert them in a diagonal fashion to save floor space.

The cable should not come into contact with the tree. Any branches that brush against the cables may lose bark. You also don’t want to wrap the cables around the tree trunk, as this can girdle it and cut off the flow of sap. Also, be sure to leave a gap of about two inches between the platforms and the tree. The common mistake that novice treehouse builders make is not giving enough room to the tree to grow.

For a treehouse to be safe, cable systems must be installed correctly. The cables should be at least four feet in length. If the cables are not long enough, they might end up damaging the tree. When installing them, make sure that the cables and brackets are installed at right angles to the tree. If they are not, the cables may wear away the bark. Be sure that the eyebolt is in the correct location and angle to the cable direction.

If the treehouse requires cables or brackets, make sure that the TAB is securely attached to the timber frame with lag screws. Then, install four sliding brackets. The cables must be secure and stable so that they don’t come loose in the event of a move. When the treehouse is in motion, cables and brackets can cut the bark of the tree. They must be secured to the tree, and ideally, the treehouse must be placed in a location where it won’t cause damage to it.

Continue Reading

Trending