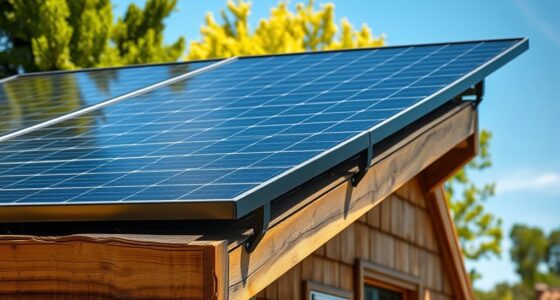
Solar Panel Installation and Maintenance
Do Solar Panels Need to Be Cleaned?

If you want to clean your solar panels, there are a few things that you can do. First, be careful not to use high-pressure cleaning, as this will damage the efficiency of the solar system. Secondly, make sure you avoid dust on the panels, as this will decrease your revenue. Fortunately, you can avoid cleaning them with high-pressure cleaning by using the rain.

High-pressure cleaning can ruin the efficiency of the solar system
High-pressure cleaning is not a good idea as it can damage solar panels and reduce their efficiency. This practice can also void your warranty, so it is best to hire a solar energy professional. This professional can provide a free estimate for solar panel cleaning and maintenance.
To ensure maximum efficiency, it is recommended that solar panels be cleaned at least once per six months. However, this frequency can vary depending on the weather and the pollution level in your area. If you live in a location that experiences heavy rainfall, you may have to clean them more often.
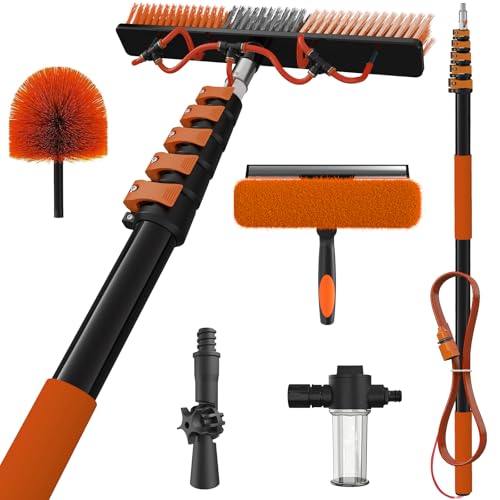
Pollen is a common enemy of solar panels
The efficiency of solar panels can be affected by pollen. Pollen is an organic material that doesn’t dissolve in water and can accumulate on the surface of solar panels. It is not just blown away by the wind, making it more difficult to remove. Pollen is carried by pollinating agents, such as insects, birds, and even humans. The pollen is often so thick that it forms a green haze, which can affect the efficiency of the panels.
One way to keep pollen from affecting solar panels is to keep the environment as clean as possible. For example, rain can help remove pollen from photovoltaic panels, but it will not prevent the panels from functioning at their best. In fact, it can even reduce the amount of energy produced by solar panels by more than 7%, according to a University of California study. Snow is another common enemy of photovoltaic panel. It blocks the sun’s rays from reaching them. A thin layer of powder will not completely block the sun’s rays from reaching the panels. However, a thick layer snow will make them inefficient.
Most solar panel installations can be cleaned easily. The quality of module glass helps with this, and the angle of most rooftops make it easy to keep panels clean. You should clean dirt and pollen once or twice per year. However, if you live in an area with high levels of pollution, it might be necessary to clean more often.
When cleaning solar panels, you should never use non-specialized cleaning products. You should also avoid using high-pressure water to clean the panels. This could cause damage to delicate components and even cause the panel to fail. If you use a power washer or high-pressure water, you could even damage the panels by promoting the corrosion of the fine wires.
Loss of revenue can be caused by dust on solar panels
The reduction in power output caused by dust on solar panels can result in a loss of revenue for solar power equipment owners. The amount of revenue lost depends on the costs of mitigation and deposition rates. In most locations, dust causes a loss of two to five percent of the annual revenue.
This problem is compounded by the fact that PV panels are exposed to air pollution and other elements. These factors can impact their efficiency. In coastal areas, bird droppings and dust can affect the performance of the PV cells. Other factors, such as temperature or humidity, can also affect the performance and efficiency of PV cells.
Solar panel manufacturers have taken steps to reduce soiling in order to prevent this loss. One way is to apply a coating over the panels. Hydrophobic coatings repel water, but they can’t work on panels that are almost horizontal. Solar panel owners should inspect their panels after each rainstorm.
Studies have shown that dust can reduce solar panel output by up to thirty percent. The amount of dust and soiling varies depending on where the panels are installed. In dry weather, dust and soiling can have a greater impact. Even the smallest dust particles can affect efficiency. As a result, this can cause a loss of revenue. In many cases, reapplication can be costly. Dust particles can also cause damage to equipment and vehicles.
This problem has led us to a new solution. A new electrostatic system, called Electrostatic Repulsion, works by applying an electric charge to dust particles. It uses a metal bar-electrode that passes close to the solar panel’s surface. The charge induced in the dust particles causes it to jump off and out of the panel. A timer and guide rail along the side of the panel can make this system automated.
Other factors that may influence dust coverage include the location of solar panels. Wind-blown dust is more likely to settle on panels located near factories, fields, and busy roads. Therefore, cleaning the panels after a rain may make sense.
Solar panels can be cleaned by rain
Rain can also benefit solar panels. Over time, dust and other particles can accumulate on solar panels. Rain can help wash away some of the dust, but it can also contain contaminants that decrease energy output. A Spanish study found that solar panels that were left without rain for long periods of time lost up to 20% of their energy output. The solar panels can also become more dirty and dusty the longer it is dry.
Although rain is a natural cleaning agent, it is still recommended to pitch solar panels properly. It will not remove baked-on dirt. A solar panel can get dirty after six months and block out sunlight. This may not be removed by a few weeks of rain.
Solar panel cleaning should be done at night. Cold water hitting hot glass could cause cracks. Also, make sure to shut off your solar system before cleaning, and disconnect any gutters or rainwater collectors. This will protect your solar panels from water damage while you clean them.
Avoid using harsh cleaning solutions to clean solar panels. The chemicals in these solutions can damage your solar panels and reduce the amount of energy that they produce. Therefore, you should use water that is deionized or distilled. These waters will have less abrasive properties than tap water.
Use a soft scrubber with clean water to clean solar panels. Dip the scrubber in soapy water and gently scrub the glass on your solar panel. The panel should be rinsed with clean water. Finally, dry the panel by squeegeeing it dry. When you do this, make sure you wear protective gear so that you do not get hurt.
When it comes to cleaning solar panels, water is the most common ingredient. The water will wash away the dirt and dust that have built up on the panels. Some stains and debris may not be easy to remove. If you want to avoid this, you should use a cleaning solution made from mild dish soap. This soap is gentle and safe for solar panels.
Hi, I’m Emma. I’m the Editor in Chief of Tiny House 43, a blog all about tiny houses. While tree houses are often associated with childhood, they can be the perfect adult retreat. They offer a cozy space to relax and unwind, surrounded by nature. And since they’re typically built on stilts or raised platforms, they offer stunning views that traditional homes simply can’t match. If you’re looking for a unique and romantic getaway, a tree house tiny house might just be the perfect option.

Solar Panel Installation and Maintenance
How Do I Make a Lift for My Tiny House 2nd Floor

Did you know that adding a lift to your tiny house’s second floor can greatly improve accessibility and convenience? If you’re wondering how to make a lift for your tiny house, you’re in the right place.
In this article, I’ll provide you with practical information on different types of lifts, space and weight requirements, DIY options, and professional installation services. Safety considerations will also be discussed, ensuring that you can enjoy your tiny house lift with peace of mind.
Key Takeaways
- There are different types of lifts available for tiny house second floors, including vertical lifts, inclined lifts, hydraulic lifts, and electric lifts.
- When determining the space and weight requirements for a lift, it is important to measure the dimensions of the area and calculate the maximum weight capacity needed.
- DIY lift options for tiny houses include pulley systems and scissor lifts, which provide easy access to the second floor and can be installed using winches, hand cranks, or folding supports.
- Hiring a professional lift installation service ensures correct and safe installation, compliance with building codes and regulations, and saves time and effort.
Types of Lifts for Tiny House Second Floors
I’ll discuss the different types of lifts for my tiny house second floor.
When it comes to lifts, there are two main types to consider: vertical and inclined lifts. Vertical lifts are the most common option, as they provide a straight, vertical movement, making them suitable for small spaces like tiny houses. On the other hand, inclined lifts are designed for staircases or sloped areas, allowing for a smooth and controlled ascent or descent.
Now, let’s talk about the power source. Lifts can be either hydraulic or electric. Hydraulic lifts use fluid pressure to operate, providing a reliable and efficient lifting mechanism. They’re often used in commercial settings, but can also be adapted for residential use. Electric lifts, on the other hand, rely on electricity for their operation. They’re generally quieter and require less maintenance compared to hydraulic lifts.
Consider your space constraints and power availability when choosing a lift for your tiny house second floor. Both vertical and inclined lifts, whether hydraulic or electric, can provide the convenience and accessibility you need.
Determining the Space and Weight Requirements for Your Lift
To determine the space and weight requirements for my lift, I need to carefully measure the available area and consider the maximum weight capacity needed. Calculating lift costs and designing a custom lift requires precise measurements and consideration of various factors.
First, I’ll measure the dimensions of the area where the lift will be installed, including the height, width, and depth. This will help determine the size and type of lift that will fit within the available space.
Next, I’ll calculate the maximum weight capacity needed for the lift, taking into account the weight of the objects or individuals that will be transported. By accurately assessing the space and weight requirements, I can ensure that the lift will function safely and efficiently.
With these measurements in hand, I can now explore the DIY lift options for tiny houses.
DIY Lift Options for Tiny Houses
There are several DIY lift options available for tiny houses that can help maximize space and provide easy access to the second floor.
When it comes to portable lift options, one cost-effective lift solution is a pulley system. This involves using a series of ropes and pulleys to lift and lower objects or people. By attaching the pulleys to the ceiling and using a winch or hand crank, you can easily raise and lower a platform or elevator.
Another option is a scissor lift, which uses a mechanism of linked folding supports to raise and lower the platform. These lifts are compact and can be installed in a small space.
Both of these DIY lift options offer a practical and efficient way to access the second floor of your tiny house.
Hiring a Professional Lift Installation Service
I’d recommend hiring a professional lift installation service for your tiny house’s second floor. While DIY lift options may be tempting, there are several benefits to opting for professional installation. First, professionals have the expertise and experience to ensure that the lift is installed correctly and safely. They are familiar with building codes and regulations, ensuring that your lift meets all necessary requirements. Additionally, professional installation can save you time and effort. Instead of spending hours researching and attempting to install the lift yourself, you can rely on professionals to handle the job efficiently.
To further illustrate the advantages of professional lift installation, let’s compare the costs between professional and DIY options:
Aspect | Professional Installation | DIY Installation |
---|---|---|
Cost | $$$ | $ |
Expertise and Experience | Yes | No |
Time and Effort | Minimal | Significant |
Compliance with Regulations | Yes | Not guaranteed |
Safety Considerations for Lifts in Tiny Houses
One important safety consideration for lifts in tiny houses is ensuring that the weight capacity is clearly labeled and never exceeded. It’s crucial to adhere to the specified weight limit to prevent overloading the lift, which can lead to structural damage or even collapse.
Another safety consideration is the installation process. It’s recommended to hire a professional lift installation service to ensure proper installation and compliance with safety standards. This includes following the manufacturer’s instructions and guidelines for installation, as well as obtaining any necessary permits or certifications.
Additionally, regular maintenance is essential to ensure the safe operation of the lift. This may include routine inspections, lubrication of moving parts, and addressing any issues promptly.
Adhering to these safety considerations and maintenance requirements is crucial for the safe and reliable use of lifts in tiny houses.
Frequently Asked Questions
How Much Does a Lift for a Tiny House Second Floor Cost on Average?
On average, the cost of a lift for a tiny house second floor can vary depending on several factors such as size, materials, and installation requirements. There are also alternative options to consider for accessing the second floor.
Can I Install a Lift in a Tiny House Without a Second Floor?
Installing a lift in a tiny house without a second floor is not recommended due to safety concerns. It is important to have a stable structure and proper support for the lift to ensure the safety of occupants.
Are There Any Specific Building Codes or Regulations I Need to Follow When Installing a Lift in My Tiny House?
When installing a lift in a tiny house, it is crucial to ensure building code compliance and follow safety regulations. These guidelines are in place to prioritize the well-being of residents and guarantee structural integrity.
What Are the Maintenance Requirements for a Lift in a Tiny House?
Maintaining a lift in a tiny house requires diligent attention to safety measures. Regular inspections are crucial to ensure its proper functioning. Following maintenance guidelines will help keep the lift in optimal condition.
Can a Lift Be Installed in a Tiny House That Is Already Built, or Does It Need to Be Installed During the Construction Process?
Installing a lift in an existing tiny house is possible through retrofitting. It doesn’t have to be installed during the construction process. Professional assistance is recommended to ensure proper installation and safety compliance.
Conclusion
In conclusion, when it comes to adding a lift to the second floor of your tiny house, there are various options to consider. You can choose between DIY options or hire a professional lift installation service depending on your skills and budget.
It’s crucial to determine the space and weight requirements for your lift to ensure safety and functionality.
So, why settle for stairs when a lift can provide convenience and accessibility to your tiny house?
I’m Theodore, and I love tiny houses. In fact, I’m the author of Tiny House 43, a book about tiny houses that are also tree houses. I think they’re magical places where imaginations can run wild and adventures are just waiting to happen.
While tree houses are often associated with childhood, they can be the perfect adult retreat. They offer a cozy space to relax and unwind, surrounded by nature. And since they’re typically built on stilts or raised platforms, they offer stunning views that traditional homes simply can’t match.
If you’re looking for a unique and romantic getaway, a tree house tiny house might just be the perfect option.
Solar Panel Installation and Maintenance
Choosing a Battery Less Solar Inverter


There are many factors to consider when choosing a solar-inverter for your home. The first thing to decide on is whether you need a Pure Sine Wave (PWB) inverter or a hybrid system. You should also consider how much power and how long it will take to generate that power. A compact unit can also be mounted on a wall.
Blocking diode
Blocking diodes are electronic components that are used to provide a path for the current from a solar panel to the battery. They also help to protect the battery in case of a short circuit.
Blocking diodes are commonly found on sailboats with two or more solar panels. They can be fitted into standard fuse holders and are rated to carry five amps.
In a basic photovoltaic system, there are four main parts. These include the solar cell, the solar panel, a charge controller, and the battery.
A solar cell generates electricity at clear skies. The amount of sunlight hitting the cell determines the current. The energy flow reverses when the panel is shaded. It is then used for charging the battery.
Solar cells can also be connected directly to the battery. However, this is not a good idea. This is because the current could back up through the cells, causing damage. An effective solution is to connect the panels to the battery and then use a charge controller to limit the voltage.
Blocking diodes are useful in certain situations, but they also have their downsides. For example, if you connect your panel to your battery, the energy that is generated will be lost if the battery is drained in the dark.
The amount of energy lost is usually less that tenths to milliwatts. If the sun is shining, it can cause significant yield drops. You should always use the diode correctly.
Blocking diodes are a great way to prevent damage to your solar modules and to make sure that all of the energy you collect is safely stored. There are other factors to consider.
Pure Sine Wave inverter
A Pure Sine Wave Inverter is a great option if you want to reduce your power bills. Inverters are able to convert DC electricity from solar panels into AC electricity, providing a more stable source of power.
Pure sine wave inverters can be expensive. It is a good idea that you shop around before purchasing one. You might find a cheaper model than you thought, but it won’t perform as well as you wanted it to.
You can check whether your devices can be powered by a power inverter to find out its performance. This can be done by plugging the device into a wall socket and switching off the power.
Non-pure sine waves can be irritating to many appliances, including televisions, computers, microwaves, and computers. These types of currents may cause problems with these devices, such as stuttering, weird printouts, and glitches. These devices will run smoothly if you choose a pure sine wave converter.
A pure sine wave converter is an essential part of any battery less solar power system, depending on what type of electronics you have. These devices can help you cut down on your electricity bills and keep your sensitive electronic equipment working.
A pure sine wave inverter is a great investment for most homes. Having one in place can also help you avoid a potential electrical fire.
Because of its efficiency, a pure sine wave inverter helps you save on your electric bill. There are a number of models available to choose from, including portable models, and heavy-duty inverters. Each model has its own advantages.
When choosing a Pure Sine Wave Inverter, the most important thing is to ensure that it produces enough power to run your devices. Also, you should get an inverter with plenty of output ports. Multiple output ports allow you to charge multiple devices simultaneously.
Hybrid systems
Hybrid systems offer a great solution for anyone who is looking to have both the flexibility of solar power and the security of having backup power in case of power outages. The key is having a battery storage system in place.
Compared to an off-grid system, hybrid systems are cheaper. They are also more powerful. A hybrid inverter might be worth the extra expense if you live in an area with frequent power outages.
A hybrid system provides power for the day and night, which is not possible with an off-grid system. This allows you to use it in adverse weather conditions and to keep your phone topped up during outages.
A battery can help you reduce your electric bills. Depending on your energy needs, you can store a certain amount of solar energy in your battery so that you can draw on it at a later time.
A hybrid system also has the advantage of being able to export any excess electricity to the grid. By doing so, you can reduce your energy costs and lock in low rates for years.
Hybrid systems are also less expensive than purely on-grid solar systems. It is a good idea to discuss your power needs with a professional installer before deciding which type of system is best for you.
Some hybrid inverters can be connected to a dedicated switchboard, which can supply essential circuits during blackouts. These types of inverters are more cost-effective than buying a separate battery unit.
Solar power monitoring software can help you to track your solar energy output and to identify problems with your system. You can access this information through a smartphone app that connects to your inverter.
Make sure to size the inverter correctly
When choosing an inverter, there are many factors to consider. First, calculate your power consumption. Then, check the inverter’s capacity. It should be capable of handling a typical load and a maximum peak load.
Typically, you want to choose an inverter that has a continuous power rating of at least 2250 watts. You will need to increase the capacity of your inverter if you plan to run more than one appliance simultaneously.
You can estimate your power needs by adding the wattage of all the devices you want to run. If you know the wattage of each device, you can also use the bare minimum figure. It’s a good idea, however, to increase the safety factor by at least 10-20%
There are many sizes and shapes of inverters. High-frequency switching type inverters are lighter and smaller. They are also cheaper in the lower power ranges.
When shopping for an inverter, make sure the battery is deep-cycle. This is important because it must be recharged when the power is used. A deep-cycle battery can be recharged by a gas generator, solar panels or an automobile motor.
Before purchasing an inverter, measure the power requirements for each device that you plan to plug into it. This will help you choose the right size. Don’t oversize the inverter or it will overload.
Inverters can also have cooling fans built in to prolong the battery’s life. It is a good idea that the inverter is located somewhere cool and dry. Using an inverter at the bottom of a home or garage is not usually a good idea, as it can heat up too quickly.
Delivery time
It is a good question to ask: How long does it take for your battery-less solar inverter from the manufacturer to reach your home? This is not an easy question to answer because there are many factors that play into it. These include the state of the economy, local zoning laws, and the quality of the component parts. Asking for a free estimate is the best way to approach your question. Rolls Battery Engineering (RTBE), can help you with this department. As a matter of fact, the company is so well versed in the industry, they even have a special program to help customers integrate their new purchase. No matter if you’re a beginner or a professional, don’t hesitate to contact the pros for a free quote.
In particular, you should take note of the company’s “M” or “M2” acronym as you are sure to receive a thorough and honest response. If you live in an area that has good old USPS, you might be surprised to find out that the Standard Delivery rates of the company apply to your product. RTBE also has an impressive system integration program that can save you a bundle on your next order.
The company’s technical staff has also discovered some of the more obscure secrets in the industry. They have created an online forum for solar enthusiasts and manufacturers to discuss topics such as the next-generation battery optimiser and its impressive range of recyclable inverter materials. RTBE also has a large stockpile of the most innovative components, so your project will be a step ahead of the rest.
Hi, I’m Emma. I’m the Editor in Chief of Tiny House 43, a blog all about tiny houses. While tree houses are often associated with childhood, they can be the perfect adult retreat. They offer a cozy space to relax and unwind, surrounded by nature. And since they’re typically built on stilts or raised platforms, they offer stunning views that traditional homes simply can’t match. If you’re looking for a unique and romantic getaway, a tree house tiny house might just be the perfect option.
Solar Panel Installation and Maintenance
Should Solar Panels Face North Or South?

The first question to ask is “should solar panels face north or south?” The sun is not in a direct line with your home unless you are on the equator, which means that the sun’s rays won’t hit your solar panels straight on. Instead, the sun will move at an angle, so the best choice would be to place them to face the south.

West-facing solar panels are more economical than south-facing solar panels
While solar panels facing south are best for year-round usage, panels facing west are great for peak hours for maximum solar energy production. Many utilities charge higher prices during peak hours, so using solar power at these times can mitigate the costs associated with peak-hour power usage. Actually, solar panels facing west can produce up to 50% more energy than those facing south.
Most people prefer to have their solar panels facing south. This is because solar panels facing south receive more light from the setting sun and generate more power during the late afternoon and evening hours. Solar panels facing west, on the other hand, receive less sunlight which reduces their total solar production for the day. The peak and off-peak electricity rates will determine the optimal orientation. If your peak and off-peak rates are about three times higher than the off-peak rates, then the ideal orientation is southwest or slightly west of south.
Plan your solar panels in the direction that receives the greatest amount of direct sunlight. For example, if your home is in a part of the world with cloudy skies, the best orientation is west. If your roof slopes toward the east, the panels can be placed on the east side. For this purpose, you can use the NREL PVWatts tool.
Depending on where you live, the optimal solar panel angle can be anywhere from thirty to forty degrees. For Alaskans, the optimal solar panel angle is forty degrees or higher. Although the angle is crucial for solar energy production, it can also help in maintenance as snow is likely to slide off of a higher angle.
Although they produce less electricity than panels facing south, west-facing panels still generate more electricity during peak hours. A recent study found that a 5.5-kW system facing west produced about 50 percent more electricity during peak hour than one with a southfacing solar panel. Even though the overall production is lower, it can still be a good option if you spend most of your day outside.
During summer, when the sun is overhead, solar panels will produce the most energy. On-peak energy is worth nearly twice as much as off-peak energy. In winter, the amount generated by a solar array in the winter months is about twenty percent lower.
Despite their lower output, west-facing solar panels will save you money on electricity bills. They also provide more energy during peak hours in the afternoon, which is when electricity is used most. This means that a west-facing panel will lower your household power bills by up to four percent.
For the best prices on solar panels, consult a solar provider. The costs vary depending on the size of the system. Solar power systems larger than a typical one will require more equipment and labor, but they will be more cost-effective in the long term.
Incentivize west-facing solar panels for peak demand
Many utilities offer financial incentives to convert to solar energy from older power plants. Some plans even pay as much as 35 cents per kilowatt hour for late afternoon or early morning power. These incentives are intended to encourage solar panel installation and avoid the high marginal cost associated with peaker power plants. The California Energy Commission recently ruled that new west-facing solar installations can qualify for a $500 incentive.
For energy production, the optimal orientation is slightly east or west of south. The optimal azimuth for most sites is between 190 and 200 degrees. However, the exact azimuth can vary. The energy production value of solar panels will decrease the further south they face.
To ensure maximum output during peak demand, solar panel owners should point their panels to the west instead of the south. This will result in a lower output at night, but it will give them more energy at peak times. If you are paying per hour, it might make sense to have a west-facing panel.
Columbia Electric Utility is encouraging new solar customers to install west-facing panels to earn rebates. The utility wants to encourage solar production during peak demand. A west-facing solar array, for instance, can earn a $500 per-kilowatt rebate from Columbia. The rebates are higher for larger systems, but lower for smaller ones.
California is another reason to consider. The state has positioned itself well to take advantage of the growing popularity of solar panels in California. To reduce air pollution, the state has increased renewable energy rebates to solar homes. The state also offers financial incentives to encourage energy-efficient construction.
The utility’s time of use energy pricing system can increase the value west-facing solar arrays, according to the study. The study’s limitations are its limited geographic scope and focus on summertime. Additionally, the study only looked at a handful of residential projects in one area. It was also limited to one city and one region, which makes it difficult to predict the value of a year.
It is worth noting, that solar panels facing west can increase the system’s overall production up to 50% during peak demand hours. These benefits are due to the fact that solar-powered homes tend to use more electricity between 4 p.m. and 5 p.m., which contributes to the overall peak demand for the system.
Increase production with south-facing solar panels
Solar panels that face south will generate more power throughout the day. The sun’s path in the northern hemisphere is always to the south. This means that panels facing south will receive the most sunlight. However, panels that are angled to the east or west will generate less energy during the day.
South-facing systems are more productive than west-facing ones during off-peak hours. They produce more energy in the early afternoon, when electric use is lowest. This means that their peak output will be higher than their off-peak counterparts. Any utility impact will be offset by the lower peak load.
South-facing solar panels can also be used to store batteries. These systems are designed for power collection during the day and storage in a battery for later. The solar system can be stored in a battery to allow you to take advantage power outages or peak hours.
Although west-facing panels produce less electricity that north-facing panels, they are more productive in the afternoon. They produce about a quarter of their peak production after sunset and peak at noon. This makes them a good choice for people who spend a lot of time outdoors in the summer or who typically leave the house at sunset.
Hi, I’m Emma. I’m the Editor in Chief of Tiny House 43, a blog all about tiny houses. While tree houses are often associated with childhood, they can be the perfect adult retreat. They offer a cozy space to relax and unwind, surrounded by nature. And since they’re typically built on stilts or raised platforms, they offer stunning views that traditional homes simply can’t match. If you’re looking for a unique and romantic getaway, a tree house tiny house might just be the perfect option.
-
Beginners Guides4 months ago
How To Buy A Tesla Tiny House
-
Beginners Guides4 months ago
Tiny House Nation Where Are They Now Stephanie
-
Energy Efficiency5 months ago
Best Tiny Homes For Cold Climates
-
Beginners Guides1 year ago
Using a Climbing Net For Treehouse Construction
-
Tiny House Resources (e.g., legalities, cost, insurance, FAQs)1 year ago
Do Tiny Homes Need Planning Permission?
-
Beginners Guides4 months ago
Tiny House Nation Who Pays For The Houses
-
Beginners Guides4 months ago
Where To Park A Tiny House In New Jersey
-
Beginners Guides4 months ago
From The Show Tiny House Nation How Many Keep Their Tiny House?