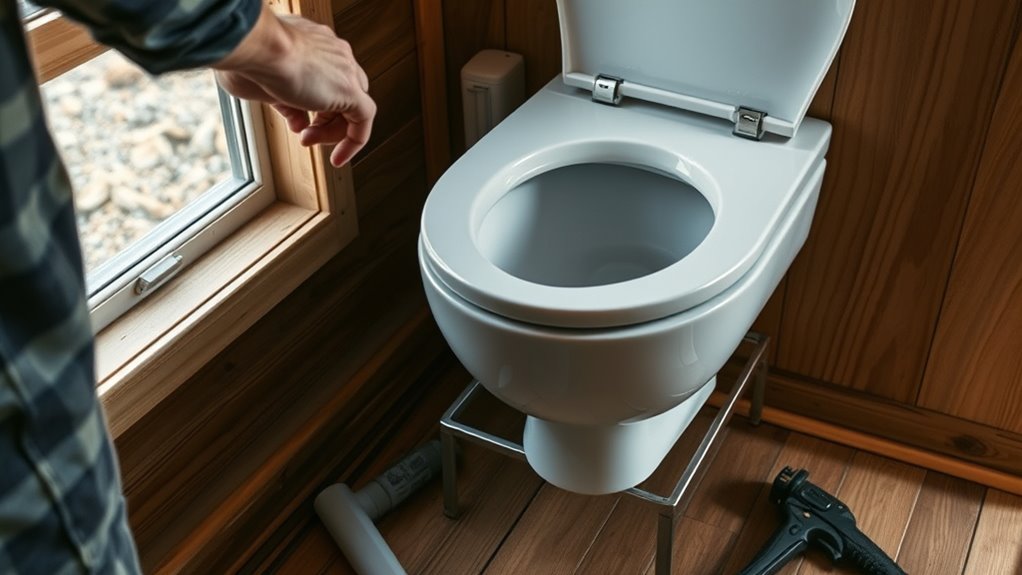

To install a composting toilet, first choose a suitable site with proper ventilation and easy access for maintenance. Level the ground and prepare a sturdy base, then assemble the toilet components securely, paying attention to seals and fittings to prevent leaks. Install the vent pipe above the roofline to control odors and ensure proper airflow. Fill with bedding material, test the system for leaks and odors, and make adjustments as needed. Keep learning to master a seamless installation.
Key Takeaways
- Select a suitable location with proper ventilation, easy access, and compliance with local regulations.
- Prepare and level the site, then assemble the toilet components according to manufacturer instructions.
- Connect the waste container securely, ensuring proper seals, and install venting extending above the roofline.
- Fill the system with bedding material like sawdust to aid moisture absorption and odor control.
- Test the system for leaks and odors, then perform regular maintenance by adding bedding and removing compost.

Installing a composting toilet is a practical way to manage waste sustainably, whether you’re building a tiny home, RV, or off-grid cabin. This choice aligns with sustainable practices by reducing water use and minimizing environmental impact. Plus, it’s an effective way to optimize limited space, as composting toilets are typically compact and versatile. When you decide to install one, start by selecting the right model for your needs, considering factors like capacity, venting options, and ease of maintenance. Once you’ve chosen your unit, locate a suitable spot that allows for proper ventilation and easy access for maintenance—ideally close to the waste collection area but outside of living spaces to prevent odors.
Before installation, review local regulations to guarantee compliance, especially if you plan to use the composted material as fertilizer. Next, prepare the site by leveling the ground and creating a sturdy base, often a concrete pad or wooden platform, to support the weight of the toilet. If your model requires venting, install the vent pipe according to the manufacturer’s instructions, making sure it extends above the roofline to facilitate proper airflow and odor control. Proper venting is essential for maintaining a fresh environment and guaranteeing the composting process functions effectively.
Connecting the toilet to its waste container is usually straightforward, but pay close attention to seals and fittings to prevent leaks. Most composting toilets are designed to be self-contained, but some may require additional components like a composting chamber or a urine-diverting mechanism. Follow the manufacturer’s instructions carefully during assembly, ensuring all parts are securely fitted and sealed. Once installed, fill the system with the recommended bedding material—such as sawdust or coconut coir—which helps absorb moisture and control odor. This step is crucial for sustainable practices, as it maintains the composting environment and prolongs the life of your system.
In addition, understanding the venting options available can greatly influence the system’s odor control and efficiency. Finally, test the system by using it as intended, monitoring for any odors or leaks. Regular maintenance, including adding bedding material and removing finished compost, is important to keep the system functioning efficiently. Remember, a well-installed composting toilet not only conserves water but also maximizes space by eliminating the need for plumbing and waste tanks, making it ideal for small or off-grid setups. By following these steps carefully, you guarantee your composting toilet operates smoothly, supporting your eco-friendly lifestyle while saving space and resources.
Frequently Asked Questions
What Is the Lifespan of a Typical Composting Toilet?
A typical composting toilet lasts about 10 to 15 years, depending on usage and maintenance. You should regularly replace biodegradable materials like compostable bags or liners, which helps with odor control and extends its lifespan. Properly managing the compost and ensuring good ventilation prevents odors and damage. With proper care and timely replacement of parts, your composting toilet will serve you well for many years.
Are Composting Toilets Suitable for Cold Climates?
In cold climates, composting toilets can work well if you take insulation considerations seriously. Think of it like wrapping a cozy blanket around your compost bin—insulation keeps warmth in, encouraging efficient composting even when temperatures drop. You might need to add extra insulation or a heat source, but with proper planning, your composting toilet can function reliably, just like a warm home in winter.
How Often Do Composting Toilets Require Maintenance?
You’ll need to perform maintenance on your composting toilet roughly every 3 to 6 months, depending on usage. Regular maintenance frequency helps prevent odors and guarantees proper composting. You should regularly check and empty the solid waste container, add bulking agents if needed, and clean the ventilation system for effective odor control. Staying consistent with these tasks keeps your toilet functioning smoothly and odor-free.
Can Composting Toilets Be Used Indoors Permanently?
Imagine turning your bathroom into a lush garden—yes, you can use a composting toilet indoors permanently. Their indoor durability makes this possible, provided you meet ventilation requirements that keep air fresh and odors at bay. With proper airflow, these eco-friendly systems blend seamlessly into your space, offering sustainable convenience. Just guarantee your ventilation is efficient; then, you’re all set for a permanent, odorless composting solution inside your home.
What Are the Costs Involved in Installation and Maintenance?
The cost considerations for installing a composting toilet include purchasing the unit, which ranges from $800 to $3,000, plus installation costs if you hire help. Maintenance expenses involve regular compost removal, bin liner replacements, and occasional parts, typically costing $50 to $150 annually. You’ll also need to factor in ongoing energy or water use if applicable. Overall, these costs are often lower than traditional plumbing, but plan for consistent upkeep.
Conclusion
Once you’ve completed your composting throne, you’ve created a cozy retreat for your waste to transform naturally. With a little care and patience, you’ll enjoy a discreet, eco-friendly solution that keeps your space fresh and inviting. Embrace the quiet elegance of sustainable living, knowing you’ve turned a simple necessity into a gentle act of stewardship. Your new composting toilet not only serves its purpose but also nurtures the environment—making every visit a step toward harmony with nature.