
TL;DR
A closet rig works best when treated as a small acoustic environment, focusing on proper placement, sound absorption, and ventilation. Distance from the noise source, sealing gaps, and strategic mic placement are key to a quiet, clear sound.
Ever tried recording in a closet? It’s the classic DIY hack because, surprisingly, small spaces can be more controlled acoustically. But the secret isn’t just slapping up foam—it’s about understanding how sound behaves in tight rooms and how to manipulate it.
If your goal is a quiet, professional-sounding setup without blowing your budget or tearing apart your apartment, you’re about to learn how to make your closet work for you. Whether you’re recording vocals, podcasting, or isolating your amp, the magic lies in placement, dampening, and ventilation.
Acoustic dampening
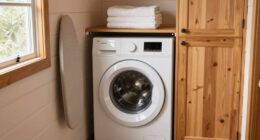
& the rig in the closet.
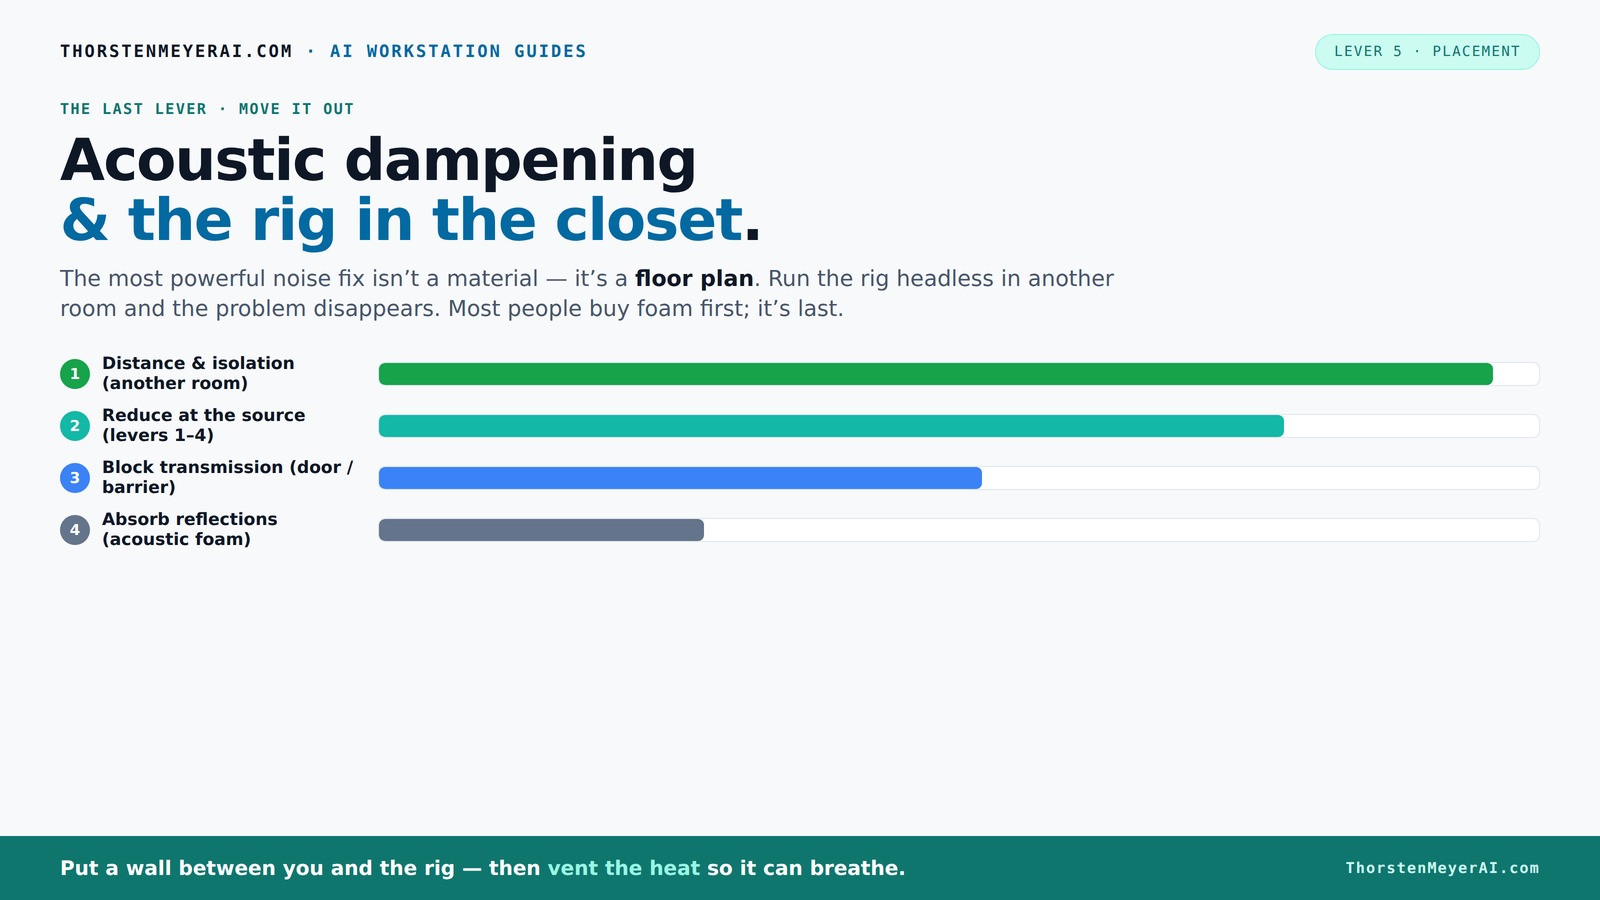
The most powerful noise fix isn’t a material — it’s a floor plan. A rig you can’t hear because it’s in another room beats any amount of foam. Tap the approaches in Part 1 to see what actually works.
(another room)
(levers 1–4)
(door / barrier)
(acoustic foam)
Contain the noise, not the heat
Key Takeaways
- Focus first on creating distance and sealing gaps—these are the most effective ways to cut noise leaks.
- Treat the primary reflection points with absorption panels, especially behind your mic and on side walls.
- Place your mic close to the source and aim for a directional pattern to minimize room sound pickup.
- Ensure your closet can breathe—ventilation prevents heat build-up that can throttle your gear.
- Use simple, reversible solutions like blankets and weatherstripping before investing in expensive acoustic treatments.

FONESO Acoustic Panels, High Density Soundproof Foam Panels, Fire Resistant Sound Absorbing Acoustic Foam Panels for Studio Recording, Black 1"x12"x12" 12 Pack with Adhesive
- Rapid Expansion: Puffs up fully within 24 hours
- High Density Material: Professional-grade sound absorption
- Enhances Sound Clarity: Reduces echoes and background noise
As an affiliate, we earn on qualifying purchases.
As an affiliate, we earn on qualifying purchases.
What Acoustic Dampening Does and Why It’s Not the Whole Story
Acoustic dampening mainly reduces echoes and reflection inside your space. Think of it as softening the room’s “reverb” rather than stopping sound from escaping. Foam panels, blankets, and rugs absorb sound waves bouncing around, making recordings clearer and less boomy.
Why does this matter? Because in small rooms, even minor reflections can significantly muddy your recordings or make your space sound harsh. Proper dampening ensures your sound is focused and natural, reducing the need for heavy post-processing. However, it’s essential to realize that dampening alone won’t prevent sound from leaking outside your space. If you want silence beyond your closet, you need to combine dampening with sealing and other soundproofing techniques. The tradeoff is that over-dampening can make your room sound unnaturally dead, which might require balancing absorption with some reflective surfaces for a natural tone.
Most people mistake dampening for soundproofing. The former makes your space less echoey; the latter stops sound from leaving or entering. Knowing this helps you choose the right tools and avoid wasted money on foam that won’t stop noise leaks.
Best Placement for Foam, Blankets, and Rugs in a Closet Studio
Placement is everything. Acoustic dampening works best when you target the primary reflection points—those spots where sound bounces directly back toward your mic or your ears. For a closet, start by placing absorption panels behind your mic, on side walls, and above your head where sound tends to reflect. This strategic positioning minimizes echoes and helps create a more controlled sound environment.
Why is this important? Because in small spaces, the location of absorbers dramatically impacts the quality of your recordings. Placing panels randomly might help a little, but targeting the reflection points ensures maximum efficiency. Rugs or blankets on the floor and near the door help tame low-frequency reflections and reduce sound leakage. For example, draping a heavy blanket over the closet door significantly cuts down on sound escaping, especially if you seal cracks with weatherstripping.
Remember: treating the first reflection points makes a huge difference in clarity. Use a mirror to find these spots—sit in your usual recording position, move a mirror along the walls, and identify where reflections bounce toward your mic. That’s where you put your absorbers. The tradeoff is that over-treating can deaden the room too much, so aim for a balanced approach that maintains some natural liveliness while controlling problematic reflections.
Microphone Placement Tips to Maximize Sound Quality in Small Spaces
Where you place the mic can make or break your sound in a small closet. Keep the mic close to the source—within 6 to 12 inches for vocals—to minimize room sound pickup. Use a directional mic (like a cardioid or hypercardioid) to focus on your voice or instrument and reject side noise. This pattern reduces the amount of reflected sound captured, which is crucial in small, reflective environments.
Why does this matter? Because the closer the mic is to the source, the less room sound leaks in, resulting in cleaner recordings. For vocals, positioning the mic slightly above or below mouth level and aiming it directly at your lips helps reject reflections from the ceiling or nearby surfaces. For amps, pointing the speaker toward a corner or wall and keeping the mic a few inches from the grille captures the amp's tone while minimizing room ambience.
Experimenting with different angles and distances is essential because small changes can dramatically improve clarity. Moving the mic just a few inches can reduce boomy low end or harsh reflections, especially in tiny spaces. Think of it as fine-tuning your tone—every inch counts.
Sealing the Door and Cracks — The Hidden Key to Quiet in a Closet
Sound leaks through gaps around the door and tiny cracks—often the biggest culprits. Sealing these is simple but game-changing. Use weatherstripping around the door frame, apply acoustic sealant to cracks, and hang a thick blanket or a DIY door sock to block sound from escaping.
Why is this so effective? Because even small gaps can let in or out significant noise, undermining your entire effort to create a quiet space. Proper sealing can reduce sound transmission by over 50%, according to hobbyist tests, making your environment much quieter without adding mass or complex treatments. The tradeoff is that if you skip sealing, no amount of foam will prevent noise leaks. Remember, sealing is often the most cost-effective and impactful step—think of it as plugging the leaks in your boat before bailing out water.
Remember: even small cracks matter. Seal every gap, and consider a door sweep if sound still leaks underneath. This comprehensive sealing approach ensures your closet remains as soundproof as possible within practical limits.
When and Why Bass Traps Matter (and When They Don’t)
Bass buildup in small rooms can muddy your sound—especially if you’re recording vocals or guitar. Bass traps absorb those low frequencies that tend to resonate in corners, but in tiny closets, they’re not always necessary or even helpful. The reason? Because in very small spaces, bass frequencies often reflect and cancel out in complex ways, making corner traps less effective or even counterproductive.
If your measurements or listening tests reveal a low-end boom—say, in the 60-150Hz range—adding bass traps in the corners can improve clarity by reducing these resonances. However, often, treating the walls and ceiling with broadband absorption reduces enough low-end reflections. Over-treating with bass traps can make your space sound unnaturally dead or even worsen the problem if placed poorly, because they may trap too much of the low frequencies, creating a muffled or boxy sound.
For example, in a closet under 4x4 feet, a thick panel behind the mic and some foam on the walls often beats corner traps. Use bass traps only if you notice a specific low-frequency problem that can’t be addressed by wall treatment alone. The tradeoff is that improper placement or overuse can diminish the natural tone you want to preserve.
Budget-Friendly Closet Booth Tricks You Can Do Today
You don’t need expensive gear to turn your closet into a good recording space. Start with thick blankets, moving pads, or even quilts hung around your recording area. Use a closet with a door you can seal tightly, and add a rug or foam panels in key spots.
Why does this work? Because these simple, reversible solutions absorb sound and block leaks at a fraction of the cost of professional treatments. For instance, a DIY setup with a few moving blankets, a thick rug, and some weatherstripping can cut noise transmission by over 40% and significantly improve clarity. The key is to focus on the primary sources of reflection and leakage, which these affordable solutions target effectively.
And don’t forget: proper mic placement close to your source, combined with these absorptive materials, greatly enhances your results. It’s about smart, strategic choices rather than expensive equipment, allowing you to optimize your space without breaking the bank.
Common Mistakes That Kill Your Closet Setup’s Effectiveness
Overrelying on foam panels and ignoring the door gaps are the biggest pitfalls. Foam absorbs but doesn’t block sound, so think of it as interior decor—not a barrier. Without sealing gaps, sound can leak in or out freely, rendering your treatments ineffective. Remember, sealing gaps around doors and windows is critical to prevent noise escape.
Another mistake is treating only the corners for bass without addressing the primary reflection points. This can lead to a dull, boxy sound with uneven frequency response. Addressing reflections at ear level and across the room creates a more natural, balanced sound.
Finally, ignoring ventilation can cause heat buildup, especially if you put a high-power rig in a sealed closet. Proper airflow prevents your gear from overheating, which can cause noise from fans or reduce equipment lifespan. The tradeoff is that poor ventilation can also allow sound to escape or enter, so plan for quiet airflow solutions that don’t compromise your acoustic isolation.
Use Cases: From Voice-overs to Guitar Amps in a Tiny Closet
A closet can be a perfect space for voice-over work, podcasting, or even recording guitar amps with the right treatment. For vocals, keep the mic close, seal gaps, and add absorption to the walls. This setup minimizes room reflections and creates a focused sound that can rival professional booths.
For amps, position the speaker toward a reflective wall or corner, and use a directional mic to focus on the sound. This reduces unwanted reflections and captures the amp’s tone clearly. Proper placement and treatment allow even small closets to produce high-quality recordings for various applications.
In all cases, your goal is to minimize reflections and sound leaks. A well-treated closet can rival a professional booth for vocals, and with proper ventilation, it can handle sustained amp use without overheating. The key is understanding the tradeoffs involved—balancing absorption, reflection, and airflow for optimal results.
For example, a hobbyist recorded a full podcast series in a closet with just blankets, a rug, and sealing the door—sound was crisp, and noise was minimal, demonstrating that with thoughtful setup, even modest treatments can yield professional results.
Frequently Asked Questions
Will foam panels actually soundproof a closet?
No, foam panels mainly reduce echoes and reflections inside the room. They do not stop sound from leaking out or in. For true soundproofing, sealing gaps and adding mass are necessary alongside dampening.Where should I place the mic in a closet booth?
Place the mic close to your mouth—about 6 to 12 inches—and aim it directly at your lips. Position it to minimize proximity to reflective surfaces, and use a directional pattern to reject room sound.How do I treat the door and gaps effectively?
Seal gaps with weatherstripping, apply acoustic sealant to cracks, and hang blankets or DIY door socks to block sound leaks. Small adjustments here yield big noise reductions.Are bass traps necessary in small closets?
Only if you notice a low-end boom or muddiness. In many small spaces, treating walls and ceiling with broadband absorption reduces bass issues more effectively than corner traps.What’s the best way to ventilate a closet rig?
Use passive vents or quiet exhaust fans to allow heat to escape. Proper airflow prevents heat buildup, which can throttle your equipment and cause noise from fans trying to cool down.Conclusion
Turning a closet into a quiet, effective recording space isn’t magic; it’s about smart placement, sealing leaks, and understanding how sound moves. Think of your closet as a tiny acoustic room—treat it like one, and it can deliver professional results without breaking the bank.
Remember: the real secret is not just dampening sound, but controlling how sound behaves in your small space. With a little effort, your closet can become your favorite corner for high-quality recordings—quiet, focused, and perfectly tuned.


![A Better Way To Tie Your Gym Shorts. (Or Any Drawstring) [Video]](https://tinyhouse43.com/wp-content/uploads/2026/07/a-better-way-to-tie-your-gym-shorts-or-any-drawstring-video-featured-260x140.jpg)