To install tiny house windows, start by accurately measuring the opening and gathering the right tools. Remove the existing trim, clean the opening, and dry-fit the new window to check alignment. Use shims to adjust as needed and apply caulk around the edges for weatherproofing. Secure the window with screws, recheck plumb and level, then seal all edges. Finish by reinstalling trim and testing the window’s operation—continue to master each step for a successful, durable installation.
Key Takeaways
- Measure the window opening precisely and remove existing trim for a clean installation area.
- Dry-fit the window to check alignment, using shims and a level for proper positioning.
- Apply high-quality caulk around the opening before placing the window for weatherproofing.
- Secure the window with screws into framing, then recheck for level and plumb.
- Seal exterior edges, reinstall trim, and test window operation for a secure, energy-efficient fit.
Installing tiny house windows may seem straightforward, but careful planning guarantees a secure and energy-efficient fit. Before you begin, gather all the tools needed to make the process smooth. You’ll want a tape measure, level, drill, screwdriver, utility knife, caulking gun, and a pry bar. Having these tools on hand helps you work efficiently and ensures everything fits snugly. Also, familiarize yourself with different window types—such as double-hung, fixed, sliding, or awning windows—so you can choose the best ones for your tiny home’s design and climate needs.
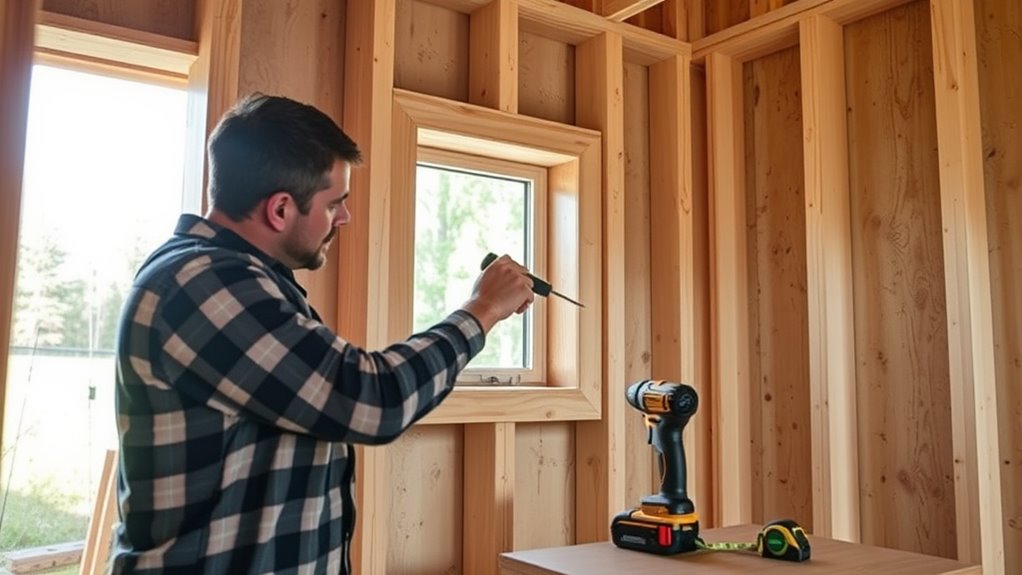
Start by measuring the opening where you plan to install the window. Accuracy is key, so double-check your measurements before purchasing or cutting. Once you have the right window type and size, remove any interior or exterior trim around the opening. Use your pry bar carefully to avoid damaging the surrounding structure. Clean the opening thoroughly, removing debris and old sealant to create a solid surface for your new window.
Measure carefully before cutting or buying to ensure a perfect fit for your tiny house window.
Next, dry-fit the window into the opening to check alignment. Use a level to ensure it’s perfectly straight, adjusting as needed. If the window fits well, apply a bead of high-quality caulk around the perimeter of the opening to create a weatherproof seal. Carefully place the window into the opening, pressing firmly to spread the caulk evenly and eliminate gaps. Secure the window with screws through the framing, following the manufacturer’s instructions. Make sure to drill pilot holes first to prevent splitting the wood or framing.
After securing the window, check its level and plumb again. Use shims if needed to keep it aligned. Once everything looks good, apply additional caulking around the exterior edges for a watertight seal. Trim any excess caulk with a utility knife for a clean finish. Reinstall any interior trim or flashing, making sure they’re properly sealed to prevent leaks. Proper installation not only ensures durability but also maximizes the window’s energy efficiency over time.
Finally, double-check the operation of the window—open and close it to confirm smooth functioning. Clean the glass and surrounding areas to remove fingerprints or debris. Keep in mind that choosing the right window type not only affects aesthetics but also impacts insulation, ventilation, and security. Whether you opt for a sliding window for easy access or a fixed pane for maximum insulation, your attention to detail during installation will ensure your tiny house is cozy, energy-efficient, and secure.
Frequently Asked Questions
What Tools Are Essential for Installing Tiny House Windows?
You’ll need a power drill to make precise holes and secure your window frame, and a pry bar to carefully remove any existing materials or adjust the fit. These tools help guarantee a snug, secure installation. Additionally, having a measuring tape, level, and screwdriver on hand will make the process smoother. With the right tools, you’ll install your tiny house windows efficiently and confidently.
How Do I Choose the Right Window Size for My Tiny House?
You choose the right window size by considering window placement to maximize natural light and ventilation. Think about how each window affects your interior space and overall aesthetic. Measure your wall areas carefully, leaving enough room for framing and insulation. Balance functional needs with visual appeal by selecting sizes that complement your tiny house’s design. Prioritize comfort and style, ensuring your windows enhance both usability and the overall look.
What Safety Precautions Should I Follow During Installation?
You should always wear personal protective equipment like gloves, goggles, and a dust mask to stay safe during installation. Use fire-resistant materials around the work area to prevent accidents. Make sure the window is securely fastened, and handle tools carefully to avoid injuries. Keep the workspace clean and organized, and follow all safety guidelines. By staying alert and cautious, you minimize risks and make the process safer for yourself.
How Can I Ensure Proper Insulation Around the Window Frame?
To guarantee proper insulation around your window frame, use effective insulation techniques like expanding foam or rigid foam boards, filling gaps completely. Seal all edges with weatherproofing methods such as caulking or weatherstripping to prevent drafts and moisture intrusion. Make sure the insulation is snug but not compressed, and double-check for any gaps. Proper sealing and insulation will improve energy efficiency and keep your tiny house comfortable year-round.
Are There Any Building Codes or Permits Required for Window Installation?
You probably thought you could just slap in a window and call it a day, right? Well, surprise! Building codes and permit requirements are real things you can’t overlook. Before installing your tiny house windows, check with local authorities to ensure compliance. Skipping permits might save time now, but it could cost you big later with fines or having to redo work. Play it safe—get the necessary approvals first.
Conclusion
Now that you’ve installed your tiny house windows, you’ve opened the door to a brighter, more inviting space—like giving your home a fresh pair of eyes. Each window is a window to your craftsmanship and vision, transforming a simple shell into a cozy sanctuary. With patience and care, you’ve built more than just walls; you’ve built a home filled with light and life. Keep nurturing that vision, and your tiny house will shine from the inside out.