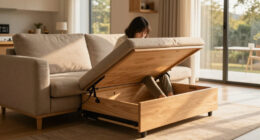
Connect with us

Beginners Guides

Treehouse Attachment Bolts

Published

on

In constructing a treehouse, ensuring the stability of the structure with bolts is crucial. Specialized bolts, known as treehouse attachment bolts, are designed for this purpose. They come in different materials, such as SL TABs, Lag bolts, Coach screws, and pipe suspension brackets. The selection of bolt is based on the design of your treehouse and the level of security needed.

Lag Bolts

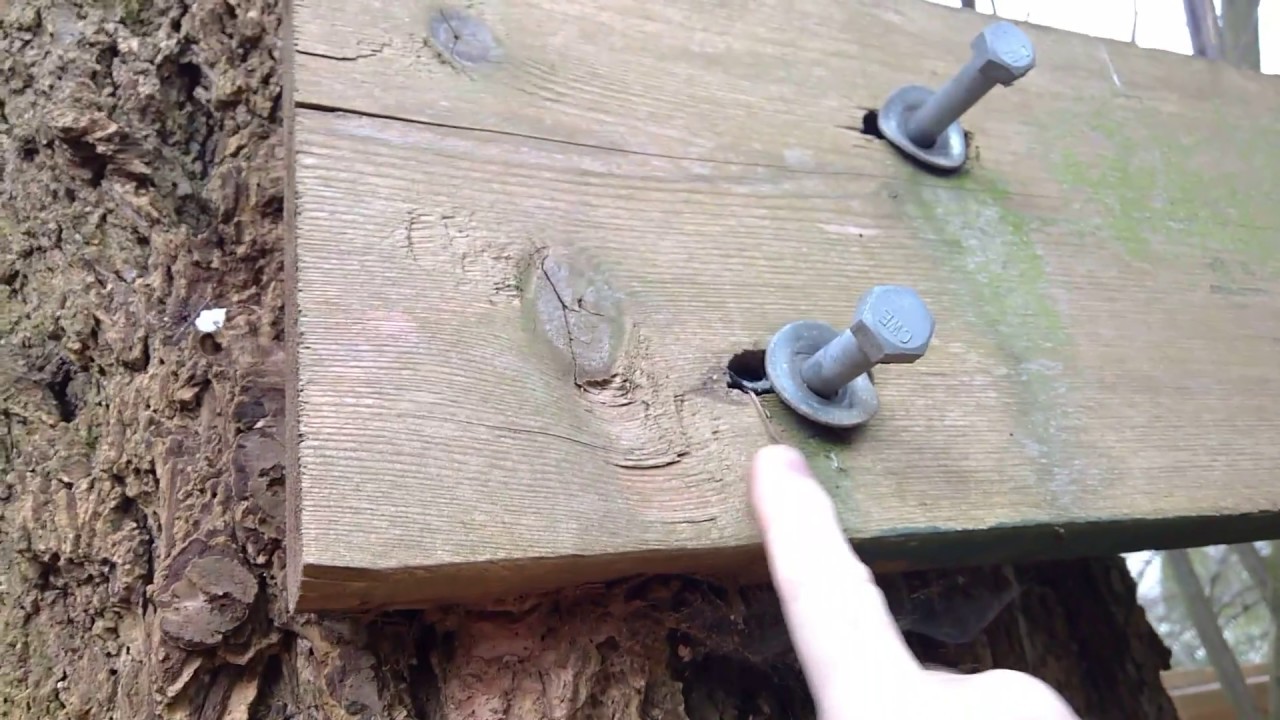
The first step in building a tree house is to find the right tree for your project. Next, draw a blueprint of the treehouse. Next, use a 15-inch galvanized lag bolt to attach the treehouse to the tree. Be sure to tighten the bolt using a socket wrench. It is important to leave about two to three inches of space between the bracket and the head of the bolt to allow for growth.

Use a pipe suspension bracket to attach your treehouse to the tree. This bracket should have a diameter of about 1.25″ and be threaded through a hole drilled 8 inches deep. Then, thread a 15-inch galvanized lag bolt into the bracket. You should leave the head of the lag bolt about two to three inches above the bracket. Next, place full-length decking about three inches from the tree. Use ring-shank nails to secure the full-length decking to the tree.

A treehouse is attached to a live tree. The tree grows outwards and constantly puts pressure on the joints connecting the treehouse to the tree. The weight of people inside the treehouse can also stress the fixtures holding the support beams to the tree. This is why using a large fastener in your project is so important. If you do not have this option, you should consider using a smaller diameter, but still use a large-sized lag bolt.

When choosing the location for your treehouse, be sure to consider the tree’s movement. If the tree is a thick trunk, you might have trouble finding the right spot for your lag bolts. Then, choose a tree with a relatively even height so that the tree can support the weight of the treehouse. When choosing the site, measure the tree’s diameter and determine which support beams should be placed on the tree. Once the measurements are complete, the next step is to install additional hardware.

Coach Screws

If you’re looking to build a treehouse, you should think about using Coach screws for treehouse attachment bolts. These bolts are designed to hold a large load in a tree securely. Coach screws are commonly used for attaching beams, but you should also consider using larger ones. The problem with 1/2-inch bolts is that they can fail when a beam is placed directly against the tree’s bark.

Another way to attach a treehouse to a tree is to use a TABS or Treehouse Attachment Bolt. These bolts are incredibly popular, and have been holding treehouses up for over twenty years. Treehouse hotelier Michael Garnier developed them. Garnier saw Jonathan Fairoaks’ prototype and set the first commercially available treehouse attachment bolt. This bolt evolved into the TAB.

Treehouse Brackets & Hardware (TAB 1.25"x9" Perch - 3" Long Collar)

If you’re planning on using a live tree, you should use a treehouse attachment bolt. These bolts are designed to attach a treehouse to a living tree. They can hold up to nine or twelve thousand pounds of weight and work in conjunction with compartmentalization, a process a living tree goes through to heal itself. If you use a coach screw for treehouse attachment bolts, you can avoid the problem of multiple compartmentalized areas and avoid rusting.

When using coach screws for treehouse attachment bolts, you should use the STAR DRIVE HEAD (TYPE 17 POINT) and not self-drilling. The STAR DRIVE HEAD will provide more leverage while driving the screw. Coach screws are not self-drilling and can be used on a variety of treehouses. Ensure the platform is level before fastening the bolts.

SL TAB

Treehouse fasteners should be strong yet prevent interference with tree growth. SL TAB treehouse attachment bolts meet these requirements. They vary in stock size, collar length, threading, heat-treating, and powder-coating. Most professional treehouse builders use SL TAB bolts. However, the size of the bolts will depend on the tree type and the treehouse’s weight.

SL TAB treehouse attachment bolts are the strongest way to secure heavy loads to trees. Unlike traditional tree screws, SL TAB treehouse attachment bolts require fewer bolts than other attachment methods. However, it’s important to remember that this type of fastener is unsuitable for smaller trees and should not be installed in any tree less than 12 inches in diameter. To install the bolts, drill two holes and ensure that they are level before installing. Once the holes are made, use a large ratchet and socket to thread the TAB into the tree.

SL TAB treehouse attachment bolts have a carbon steel body and a 6-inch steel boss. The bolt boss should be a few inches past the rim of the tree to prevent damage. The SL TAB is available in two different sizes: mini and heavy. Each one is suitable for different types of treehouses. They are available in various colors and sizes. There are even other SL TAB treehouse bolts, so you can choose the right one for your building project.

The SL TAB treehouse attachment bolts are designed explicitly for treehouse construction. They are capable of supporting a load up to 2000 pounds, so you can rest assured that they will not cause any damage to the tree or the treehouse. In addition, they are made of two pieces of steel and four sections, making them easy to install. The SL TAB treehouse bolts come with various accessories, such as cable eyes, knee brace brackets, and floating brackets.

Pipe Suspension Brackets

When installing a treehouse, quality fasteners are essential. The main beams should perch several inches from the tree trunk to allow for expansion. For this purpose, Heavy Duty Hardware is best suited. This includes Treehouse Attachment bolts, Floating Brackets, and Pipe Brackets. A professional-grade fastener can help ensure the safety of children and adults.

A typical pipe suspension bracket measures 1.25″ long and is attached to the beam with lag bolts. These are steel with a powder-coated finish. They work with lag bolts or TABs of approximately 1.25″ in diameter and are intended for cabling from a higher point on the tree. Pipe suspension brackets are generally made of steel and have a powder coat finish to prevent rust.

Treehouse attachment bolts are specially designed bolts used for attaching a treehouse. These fasteners are specifically designed for this purpose and are designed to disperse the weight. They can support 2000 pounds of weight, depending on the type of tree. Most are constructed of two pieces of steel and have four sections. They allow for the growth of the tree without affecting its structural integrity. However, treehouse attachment bolts should never be installed directly on the trunk of a tree.

The Standard Limb TAB is made of carbon steel and will support between 8,000 and ten thousand pounds. The lower loop goes around a smooth shaft, which allows the tree to grow around it. The GL system has limited range of motion, but it excludes up-and-down motion. For this reason, a longer extension is better. But it must be remembered that the longer the pipe, the more expensive it will be.

Floating Brackets

In the case of a treehouse, the best attachment method is to use brackets that allow for free movement of the building. The best option is to use floating brackets, which are designed to keep the tree healthy and extend your treehouse’s life. You can also use large bolts, but make sure that the brackets are not too close to the tree. This way, you will not damage the tree’s bark and will not risk damaging your child’s safety.

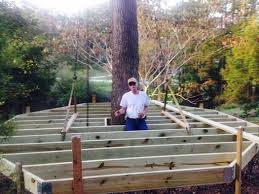
Treehouses need a platform, which presents special challenges for fastening. A tree grows taller and wider, and is prone to swaying in the wind, so fasteners need to be flexible to prevent bending or breaking. Fortunately, there are now flexible connectors that help keep beams and joists in place and still allow for movement in the tree. These brackets are also much more cost-effective than using lag bolts.

Before you can attach the floor to the platform, you must make sure that the platform is level. You can do this using a spirit level or using your visual judgement. You don’t want your platform to be out of level and complicate your construction. You’ll need to double check the level before fastening the platform. This way, you can rest assured that your platform is level. In addition, you should make sure that the platform is securely nailed to the main supports of the treehouse.

Another type of mounting bracket is known as a pipe bracket. This type of bracket can be installed on top of a TAB. It is usually 1.25″ in diameter and is used to attach the beam to the treehouse. The pipe brackets are made of steel and are powder coated to prevent corrosion. They work with 1-inch and 1.25″ diameter lag bolts. There are some variations of this type of bracket, but they should all do the job.

Continue Reading

Beginners Guides

Different Types of Treehouse Netting

Published

on

By

If the idea of constructing a treehouse is on your mind, acquiring netting for the treehouse is something you’ll probably need to do. Luckily, the market is abundant with a variety of options. Whether you’re looking for climbing nets in various hues, designs, or styles, you’ll find that these products are often marketed by linear foot and demand a certain amount of space – with 75 square feet being the starting requirement. Additionally, these nets are versatile, functioning well for both cargo lofts and hammocks. You have the flexibility to select a net that perfectly matches your treehouse project, whether that be for a hammock, a cargo loft, or a combination of both.

Dream Nets Are a Treehouse Netting

The concept behind Dream Nets is to create a tensile tree platform that can be woven on-site. It creates a safe and playful play environment that can be enjoyed by the entire family. The dream nets are made of nautical/fishery supplies and are sturdy yet flexible, making them a great choice for any treehouse. The average lifespan of the Dream Nets is 10+ years, making them a great alternative to traditional treehouse materials.

These innovative netting systems come in many different styles and colors. Tree House Supplies offers nets by the linear foot. Depending on the size of your structure, there are several different types of dream nets available. You can also purchase nets specific for hammocks, cargo lofts, or a cargo loft. If you have a large space, you can also buy a netting system that allows you to fit many different-sized hammocks and cargo bins in your treehouse.

Treehouses with net floors are fun for kids of all ages. They are an adventure for children and can be equipped with a rope swing. Kids love to swing from the treehouse and the net floor will make the experience more enjoyable. Treehouses with net floors can be constructed quickly and easily, making the experience fun for everyone. You don’t even have to spend hours or even days building the stairs. The net floors are flexible and can be customized to your child’s needs.

Spider Web Climbing Nets Are a Treehouse Netting

9.8 X 14.8FT Kids Playground Play Safety Net Outdoor Climbing Cargo Net Playground Sets Double Layers Backyard Net for Playground
Spider Web Climbing Nets

This climbing net is ideal for playgrounds, amusement parks, and residential areas. It’s easy to install with essential hand tools. The net is available in standard sizes of twelve, sixteen, and twenty feet. It has two-inch square netting liners and synthetic rope and can be attached to bridges, cargo climbs, and treehouse structures. A few tools are required to install this netting, and you’ll want to have some help if your children aren’t sure about it.

The net allows children to climb up and down without hurting themselves. These nettings are also very durable and should last a long time. These nets are often custom-made from high-quality materials. Once installed, they can be used as a treehouse roof or as an accessory for other structures. Spider web climbing nets are a great option for treehouses designed to keep kids safe. They don’t break easily and are very durable.

Double Stack Climbing Nets Are Ideal for Larger Areas

If you plan to create a playhouse in your backyard, you will need to use sturdy, double-stack climbing nets. You need to use the right knots when tying them, and most resources point you in the right direction. If you’re not sure about what knot to use, the Carrick Bend is an ideal choice. This ornamental knot is very strong and will not create sharp bends that can tear or damage your netting. However, you can experiment with different knots to ensure you’re tying the right knots to keep the net from fraying or breaking.

Double stack climbing nets are designed to accommodate multiple occupants and perfect for larger treehouse netting areas. They are made from two layers of two-inch square netting that are reinforced with a sewn edge and 5/8″ thick rope on the perimeter. The border rope also acts as a stronger connection point, and is usually attached to a wooden platform. These netting products are popular for treehouse platforms.

Treehouse Netting Can Be Used as A Ladder

Treehouse netting is an excellent alternative to traditional ladders for many reasons. Not only can it be used as a ladder, but it can also serve as a protective barrier in case of a fall. A store’s staff usually installs these nets. The installation costs depend on the size of the net, so it is best to check with the store before buying it.

Continue Reading

Beginners Guides

What Happens to a Tree House When the Tree Grows?

Published

on

By

A challenge you might encounter when constructing a tree house involves its weight. Suddenly, the tree has to bear the added weight of the structure, and the roots might need several years to expand sufficiently to support this extra load. This situation can compromise the tree’s stability during storms. Nevertheless, this issue can be mitigated. It’s advisable to evaluate the structure’s weight prior to making the decision to construct it.

Building a Treehouse

Using specialized bolts is important when building a treehouse. The platform should be at least eight feet above the ground, and the house should be out of reach of children and adults. You should also use safety measures such as railings and individual spacers to prevent falls. If you are not a construction expert, you may want to seek advice from a professional. If you are unsure of the safety precautions to take, consider a platform with railings on all sides.

If you’d like to build a treehouse, it should be built away from power lines. Power lines can fall on the branches of a tree, and a dangerous accident can lead to injury and death. Also, avoid building a treehouse near a waterfall, a working road, or a hilly area. Also, don’t forget to build a sandpit underneath the tree house. Make sure to leave enough room around the tree to accommodate the growth of the house.

You should discuss your plans with your neighbors before you start building. You’ll want to be aware of any potential legal or neighborly problems that might arise if your treehouse is too close to your neighbors’ property. While a treehouse may be fun for children, it’s not worth a neighbor’s ire. As long as you’re considerate and follow the city code, you’ll be able to enjoy your treehouse for years to come.

The cost of building a treehouse will depend on its height and size. The complexity and type of materials used will also determine the project’s overall cost. Remember that it can be hazardous to trees, so always check with a professional before you begin. For example, large bolts and fasteners can damage the tree. Also, the added weight can damage the tree’s trunk and branches. If you’re not sure of the tree’s capacity to handle the extra weight, consult with an arborist. Many tree care companies have arborists on staff.

Before building a treehouse, you should make sure the tree you plan to use is a strong one. If the tree is young and the trunk is a hardwood, you should consult with an arborist. You should also find a tree with strong limbs. You should also consider if the tree will grow to be a good fit for your new treehouse. This will ensure the safety of everyone who uses it.

Once you have a tree with enough size and shape to support a treehouse, you can start with the construction of the treehouse. You should build the base first, and then move on to the main part of the structure, the roof. If the tree is too small or too large, you may need to build a treehouse on stilts to avoid damage. Building a treehouse requires some preparation, but once you’ve completed the initial steps, you’ll be glad you did.

Problems with Tree Support

One of the most common reasons a young tree leans is its poorly developed roots. Soil that isn’t consistent, or which does not support the roots well is also a common cause. The tree may also be leaning because of wind or a wet ground. In these cases, addressing drainage patterns is essential to prevent the problem. Proper placement of stakes, cables, or other supports will prevent a tree from leaning and ensure it has sufficient support during its life.

Problems with Tree Compartmentalization

Wood decay in trees has several causes, including injuries caused by animals, inappropriate pruning cuts, and excessive weight. The damage can also occur as a result of extreme temperature changes. To survive, trees must protect themselves by creating boundary areas to prevent damage. This process is known as compartmentalization. It helps prevent the spread of discoloration and loss of normal wood function. However, this defense system can also lead to problems with tree compartmentalization.

The concept of tree compartmentalization was first introduced in the 1960s and has since become one of the standard concepts in the field. It is based on extensive studies of wood and bark. In addition to the lab, it is based on observational studies of trees in the field. This research led to the development of tree compartmentalization as a concept to describe the growth and decay of trees.

During a forest fire, the first step in preventing decay and disease is to protect the burned area. Trees respond to injury by forming a wall around it to prevent decay and disease from spreading. This wall covers the injured area and prevents the disease from spreading vertically. This wall is made up of two types of tissue: vascular tissue and thick-walled latewood growth rings.

The concept of compartmentalization was originally presented as a systems approach to decay problems. Before Shigo’s research, it was thought that living tree sapwood was dead and that decay was the result of cellular differentiation and maturation. Punky wood, a void left in a tree after wood decay, was also viewed as dead wood. With the compartmentalization concept, wood decay is understood as a multi-step process, beginning with wood formation in the vascular cambium, and culminating in apoptosis and shedding.

Continue Reading

Beginners Guides

Types of Treehouse Brackets

Published

on

By

Brackets for treehouses form a critical part of any DIY endeavor involving treehouses. A sturdy and reliable support system is indispensable for treehouse construction. A variety of bracket types can be found, with the appropriate selection varying according to the project requirements. Options range from floating brackets and J-brackets to TABs and treehouse cables. Continue reading to discover more about each kind. Each has its advantages and disadvantages. When you’re constructing a treehouse for your child, it’s important to select the suitable types.

Floating Brackets

A floating bracket can support a treehouse in the wind. This can be achieved with a single-inch lag bolt. The bracket can withstand 50 kg of weight without the use of scaffolding or cherry pickers. A cheater bar can be used for additional leverage. Once the bracket is installed, the beams need to be screwed into the flat plate of the bracket. This allows the structure to sway with the tree.

When building a treehouse, it is important to use flexible supports. If you have multiple trees, you will want to use floating brackets. They are specially designed to withstand the swaying of the trees. They are better than through bolts because they do not damage the trees. Floating brackets are also better for long-term stability, so you can enjoy your new treehouse for a long time.

In order to attach the treehouse to a living tree, you will need to use TABs. These are specially designed bolts that attach a treehouse to a tree. These can withstand thousands of pounds of weight. They also help the tree heal. Treehouse attachment bolts are easy to install and do not require any tools or training. You can find them at home improvement stores. If you decide to use these brackets, make sure to check the manufacturer’s warranty.

Tree houses weigh thousands of pounds. This means that they must be stable. When using fasteners, be sure to use large bolts. These will provide the same strength and durability as a handful of nails or screws, but will also cause less damage to the tree. Moreover, you can also use lag bolts to perch your treehouse on them. However, it is important to use fasteners made for treehouses. They should be at least 1 inch in diameter.

J-brackets

There are two main types of J-brackets for building a treehouse: simple and strong. The former is made of a single bolt which is fed into the tree from one side. The second type requires a single bolt, which is a bit longer and bigger than the first one. It is easy to use and doesn’t need any special tools. The J-bracket can be attached to the tree with rope support or scaffolding.

Another type of attachment point is a floating bracket. These are used to support the roof of the treehouse. A single J-bracket can support up to 50kg. An array of floats can be as large as three feet. These are useful if the tree needs to move. While floating brackets are more expensive, they provide more security and can support the weight of your treehouse. For safety and stability, it is a good idea to hire a professional to install the treehouse.

To install a treehouse, you must follow specific guidelines. The first rule is to keep the spacing between treehouse components at least 12 inches horizontally and vertically. The second rule is to make sure that the J-brackets are not butted against the tree trunk. If you install them at the wrong height, you run the risk of compromising the safety of both you and the tree. This disclaimer is valid for both Be in a Tree LLC and Nelson Treehouse and Supply.

Another important rule of treehouse construction is to always use a solid support system. Do not nail or glue the tree house to the tree; this will only create a wobbly structure. A good solution to this is to use diagonal bracing beneath the structure. You may only need one set if your treehouse is supported by two trees, but you can use up to four if the treehouse is supported by only one.

To attach the treehouse to the tree, you should choose a strong and sturdy beam. A two-by-ten-inch beam should span eight feet and a four-by-six-inch beam is recommended for 12 feet and greater. Remember, most localities require building permits for a treehouse, so you should check your local laws before deciding on the size of the beams. This way, your treehouse will not be a hazard to the tree.

TABs

A treehouse bracket is a simple structure that slides over the TAB to create a flexible platform for the structure. It can withstand up to one inch of wind movement and is attached to the treehouse structure with a flat plate. It has a rectangular frame that resembles a long handle. It fits over the TAB so it can move with the tree. The bracket is made of durable materials to withstand the weight of the treehouse and can also be removed and washed.

Treehouse brackets can be used for different types of structures. The J bracket is one of the most common and is the most common. It requires the beam to be fed in from one side while the J bracket is designed to be installed the other way around. Treehouse brackets can be attached to a tree using rope supports or scaffolding. A cheater bar will give you additional leverage when mounting brackets on a tree. It is important to choose the right one for your treehouse project.

Before you install a treehouse bracket, you must measure the beam and make sure it is the correct length. Remember to do this on a calm day when you don’t have to worry about the wind. During construction, you will need a metal plate for the underside of the beam to prevent it from sliding out of the bracket. Using a 1/4″ steel strip for the bearing surface will help ensure the bracket doesn’t slide off the beam.

Another type of treehouse bracket is called the floating bracket. It can be used for treehouses with three or four trees. It is also used for connecting several trees with a single tree. Floating brackets are attached with 1.25″ lag bolts. They are only compatible with 1.25″ lag bolts. If you use a TAB for your treehouse, make sure to follow the manufacturer’s instructions.

Besides TABs, you also need to consider using attachment bolts. These special bolts are made for treehouse construction and distribute the weight. In general, these bolts can support up to 2000 pounds. The nut and bracket ensure that the beams and joists are protected and won’t fall off the bolt. They also prevent any damage to the tree. However, make sure that the bolts are not too loose or too tight.

Treehouse Cables

If you’re building a treehouse, you’ll want to think about where to run the cables and brackets. While they may not seem important, they’re an important part of the structure. Cables can support long beams, overhangs, and radiating supports. Cable designs can affect how much floor space your treehouse takes up, so consider how you want to use them. You can run them along the inside of the wall, or you can divert them in a diagonal fashion to save floor space.

The cable should not come into contact with the tree. Any branches that brush against the cables may lose bark. You also don’t want to wrap the cables around the tree trunk, as this can girdle it and cut off the flow of sap. Also, be sure to leave a gap of about two inches between the platforms and the tree. The common mistake that novice treehouse builders make is not giving enough room to the tree to grow.

For a treehouse to be safe, cable systems must be installed correctly. The cables should be at least four feet in length. If the cables are not long enough, they might end up damaging the tree. When installing them, make sure that the cables and brackets are installed at right angles to the tree. If they are not, the cables may wear away the bark. Be sure that the eyebolt is in the correct location and angle to the cable direction.

If the treehouse requires cables or brackets, make sure that the TAB is securely attached to the timber frame with lag screws. Then, install four sliding brackets. The cables must be secure and stable so that they don’t come loose in the event of a move. When the treehouse is in motion, cables and brackets can cut the bark of the tree. They must be secured to the tree, and ideally, the treehouse must be placed in a location where it won’t cause damage to it.

Continue Reading

Trending